
The “Membership for WordPress and WooCommerce” plugin helps website owners manage memberships and control access to content. With this plugin, you can create and manage different membership plans, restrict access to certain posts, pages, or products, and sell membership-based products or services through WooCommerce. It provides everything you need to run a membership-based website easily.
Key Features: #
- Create and Manage Membership Plans
- Flexible Membership Tiers: Admins can set up multiple membership levels, each with different access rights or benefits.
- Sell Memberships as WordPress and WooCommerce Products: Membership plans can be sold as WooCommerce products or WordPress products, supporting payment through Stripe and PayPal.
- Content Restriction
- Restrict Content by Membership Level: You can restrict posts, pages, or custom content types to certain membership levels.
- WooCommerce Product Restriction: Make certain products or entire categories available only to members, adding value to the membership plans.
- Dynamic Content Display: Show non-members what membership plan is required to access restricted content, or redirect them to a subscription or custom page.
- Coupons for WordPress Products
- Member Discounts: Offer members special pricing, discounts, or exclusive products by applying coupons when they purchase a membership plan.
- Member Management
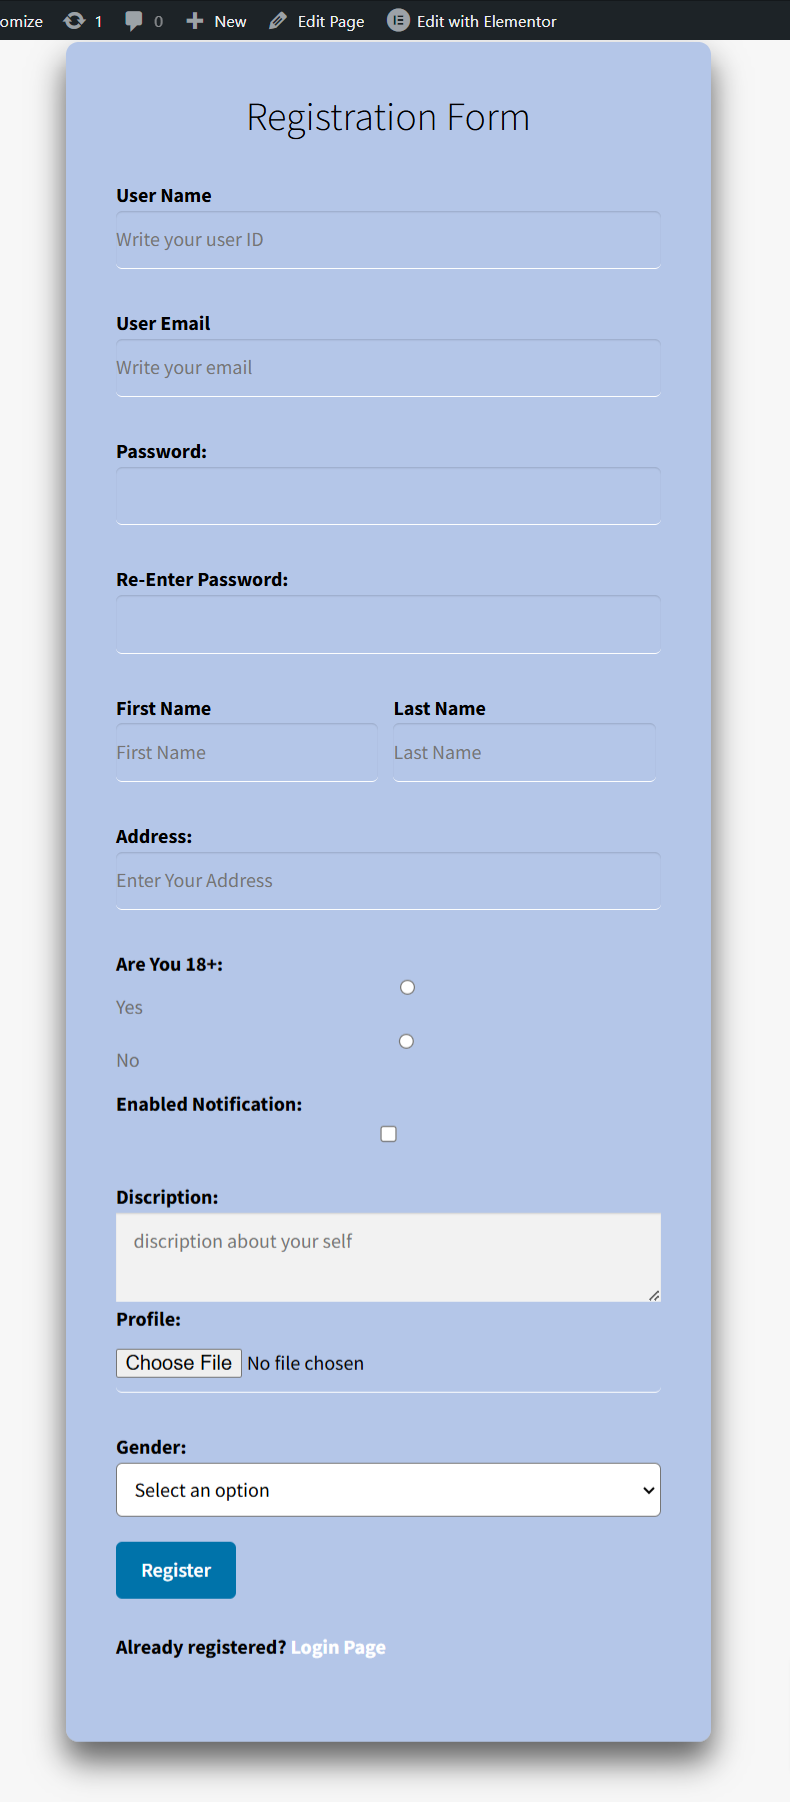
- Custom Registration Fields: Add extra fields to the registration form to collect more information from members.
- Member Dashboard: Members can easily manage their subscriptions, and renewals, and view exclusive content through a personalized dashboard.
- Make Plan as WooCommerce Product
- To create a plan as a WooCommerce product, go to the “Add New” or “Edit Product” page, select the product type “Membership Plan,” fill in the membership plan details in the membership tab, and publish the product. It will appear in the WooCommerce shop.
Features: #
- Create Recurring Plan
- Recurring Payment Plan: Admins can create a recurring plan that can initiate auto payment after the first payment it initiates auto payment by creating a billing subscription.
- One-Time Payment Plan: Membership plans having one-time payments will expire after the plan end date.
- Enable Cancel Subscription
- Enable Cancel Subscription: The admin can give the user permission to cancel the subscription or recurring payment that initiates auto payment.
- Cancel Auto or Recurring Payment: The user can cancle their subscription by clicking on the ‘Cancle‘ button shown in the custom ‘My Account’ page ‘Subscription’ section.
- View Subscribed Plan
- Get the subscribed plan details by clicking on the ‘View’ button shown in the custom ‘My Account’ page ‘Subscription’ section.
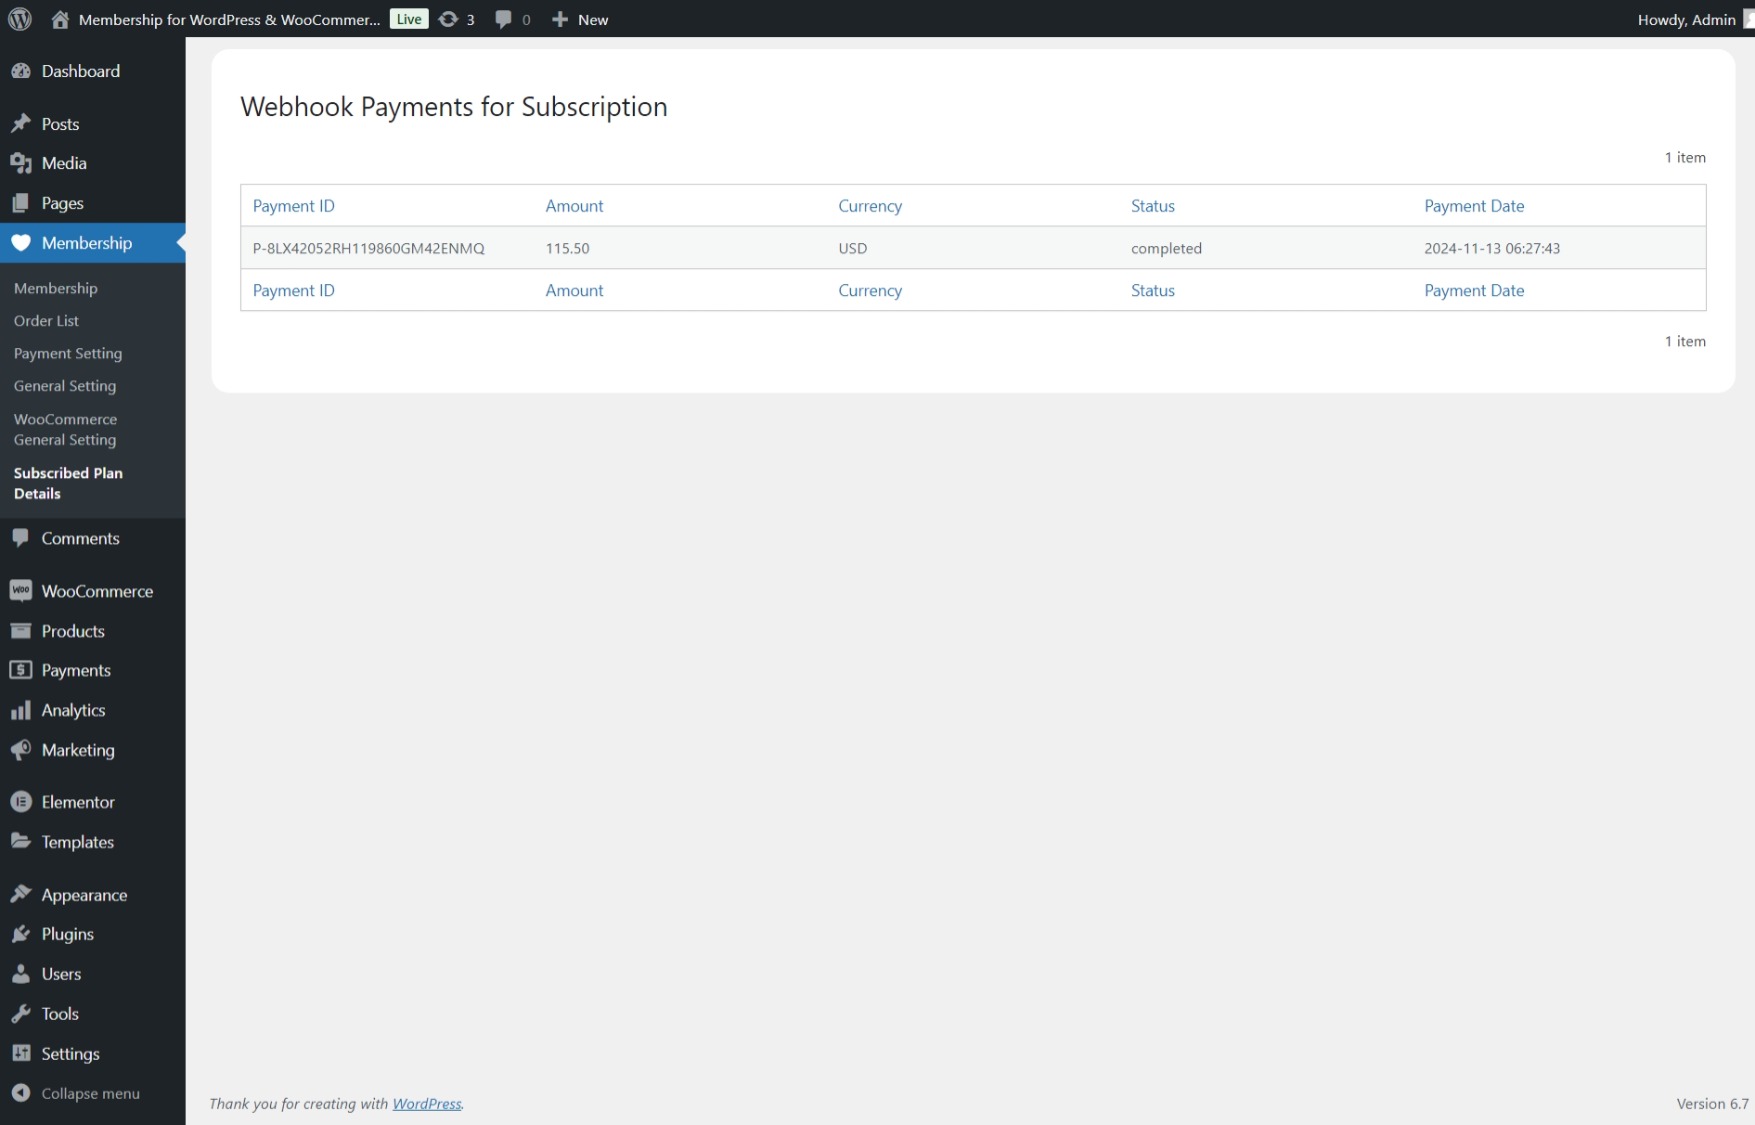
- View Recurring Payment Detail
- Recurring Payment Detail: The admin can get each recurring subscription plan payment detail by clicking on the subscription ID listed in the ‘Payment Detail ‘ column in the ‘Subscribed Plan Detail‘ table.
- Restrict WooCommerce Product Access
- The admin can create rules to restrict products using their type, category, and tags in the ‘WooCommerce General Setting’ option.
- Restrict Individual Post, Page and Product
- The admin can restrict individual Post, Page, and Product by using a custom meta field added in each Post, Page, and Product edit or add a new page.
- Easy Payment Option
- There are two payment gateways integrated into the plugin which will handle all the payments.
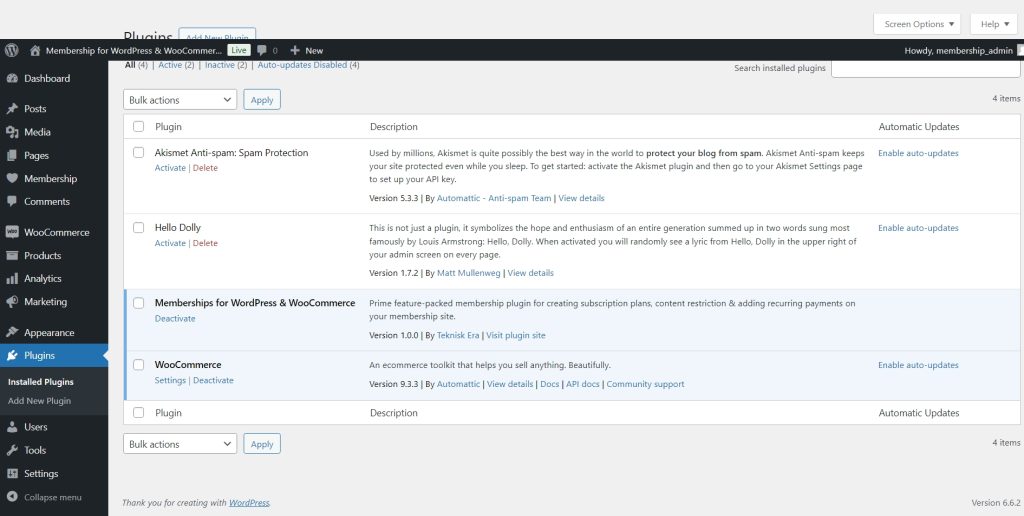
Membership for WordPress and WooCommerce Installation Process #
Follow these simple steps to install the “Membership for WordPress and WooCommerce” plugin:
- Log in to WordPress: Access your WordPress dashboard as an administrator.
- Install the Membership Plugin:
- Go to the Plugins section and click on Add New.
- Search for “Membership for WordPress and WooCommerce.”
- Click Install and then click Activate once the installation is complete.
- Install WooCommerce (if needed):
- If you want to offer membership-based products or services through WooCommerce, go to Plugins → Add New and search for “WooCommerce.”
- Click Install and then Activate.
- Configure WooCommerce according to your business needs. You can follow the WooCommerce documentation for more details.
- Activate the Membership Plugin: Once everything is set up, activate the Membership plugin.
- Access the Membership Settings: After activation, you will find a “Membership” option in the WordPress Admin Menu, where you can configure your membership plans and settings.
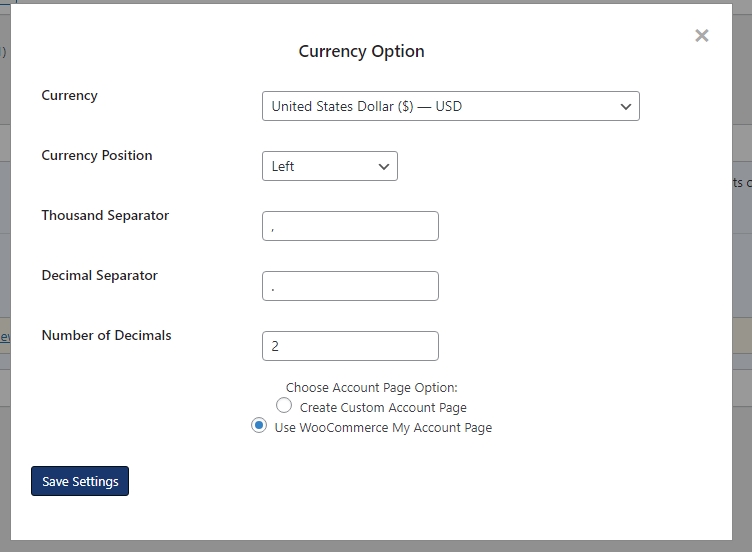
Default Setting #
After plugin activation, a popup will appear for the default settings. Here, you can set the currency settings accordingly. If you want the plugin’s ‘My Account’ page to appear in the WooCommerce ‘My Account’ menu, select the radio option ‘Use WooCommerce My Account Page.’ Alternatively, if you prefer the plugin to create its own ‘My Account’ page, choose the option ‘Create Custom Account Page.’
A step-by-step guide to setting up Membership for WordPress and WooCommece plugin #
Admin Settings #
After activating the “Membership for WordPress and WooCommerce” plugin, you’ll notice a new “Membership” option in the WordPress Admin Menu. When you click on “Membership,” you’ll find several submenu options, such as:
Membership #
In the “Membership” section of your plugin, you’ll find four main tabs:
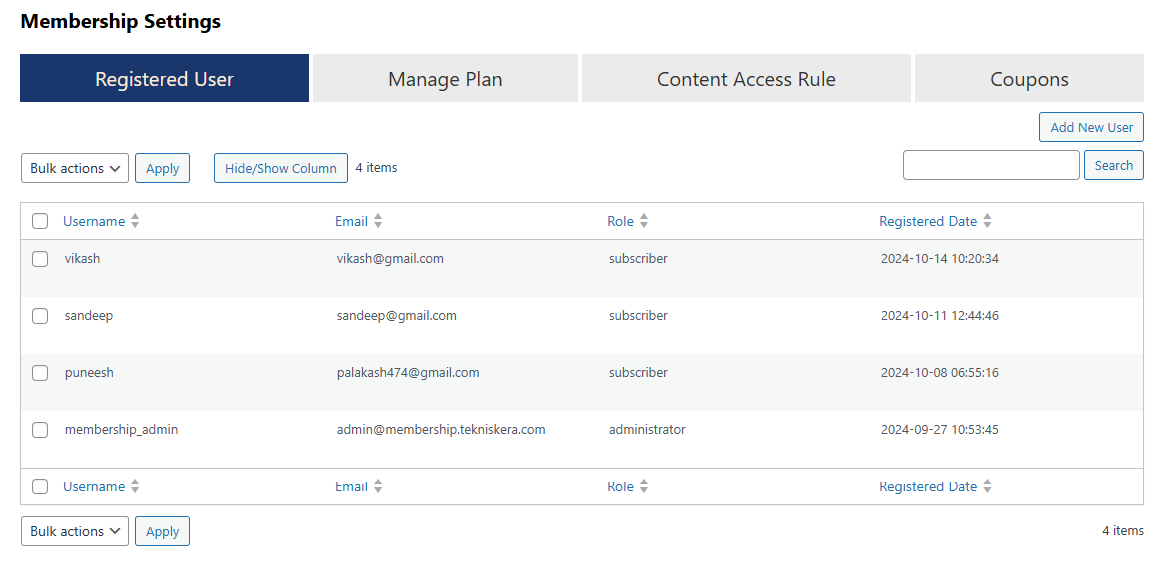
Registered User #
In the Registered User tab, all registered users are listed in a table displaying their details. To add a new user:
- Click on the “Add New User” button.
- A form will open where you can enter the new user’s details (e.g., name, email, membership plan).
- After filling in the required fields, click “Save Changes”.
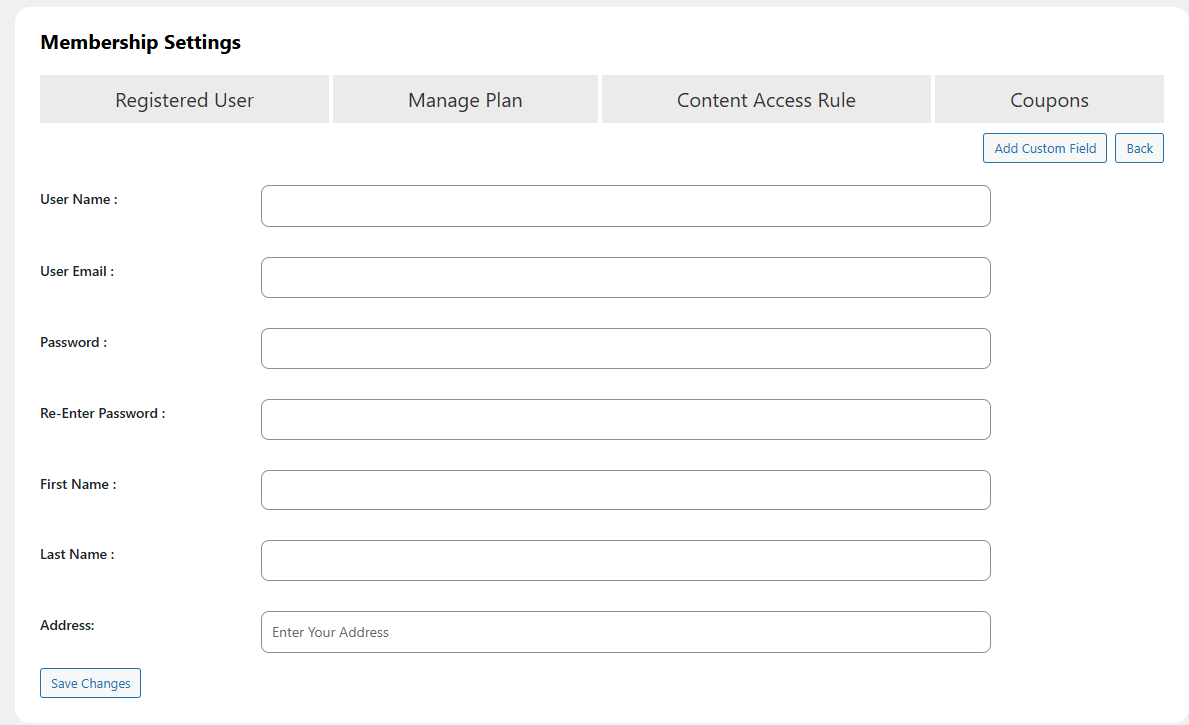
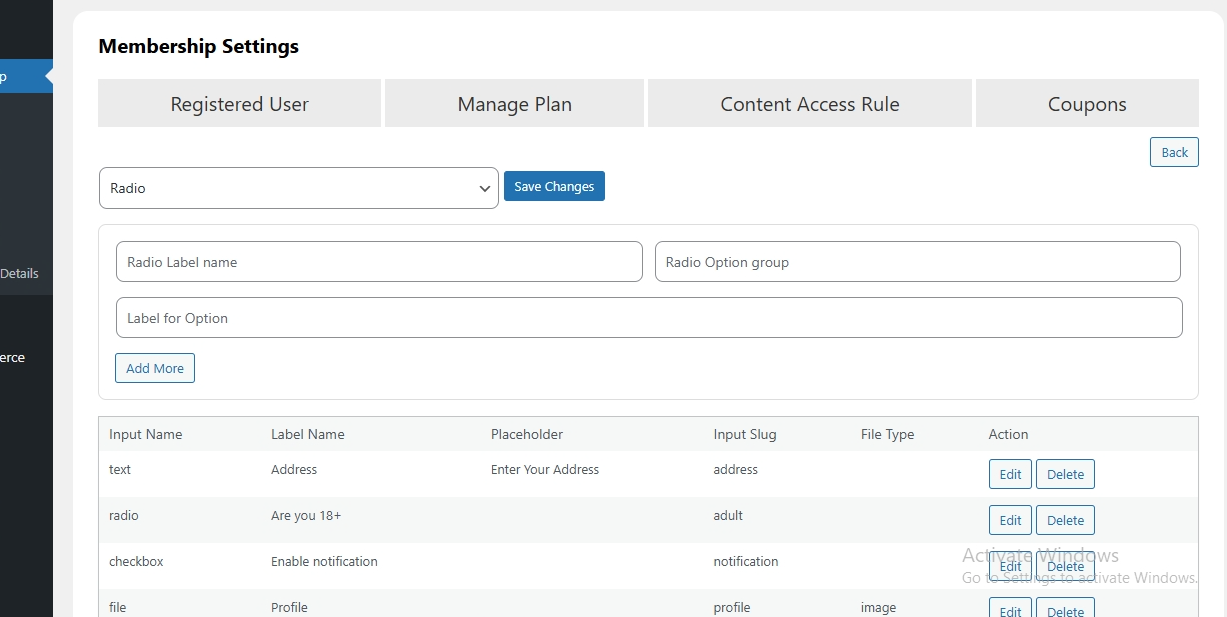
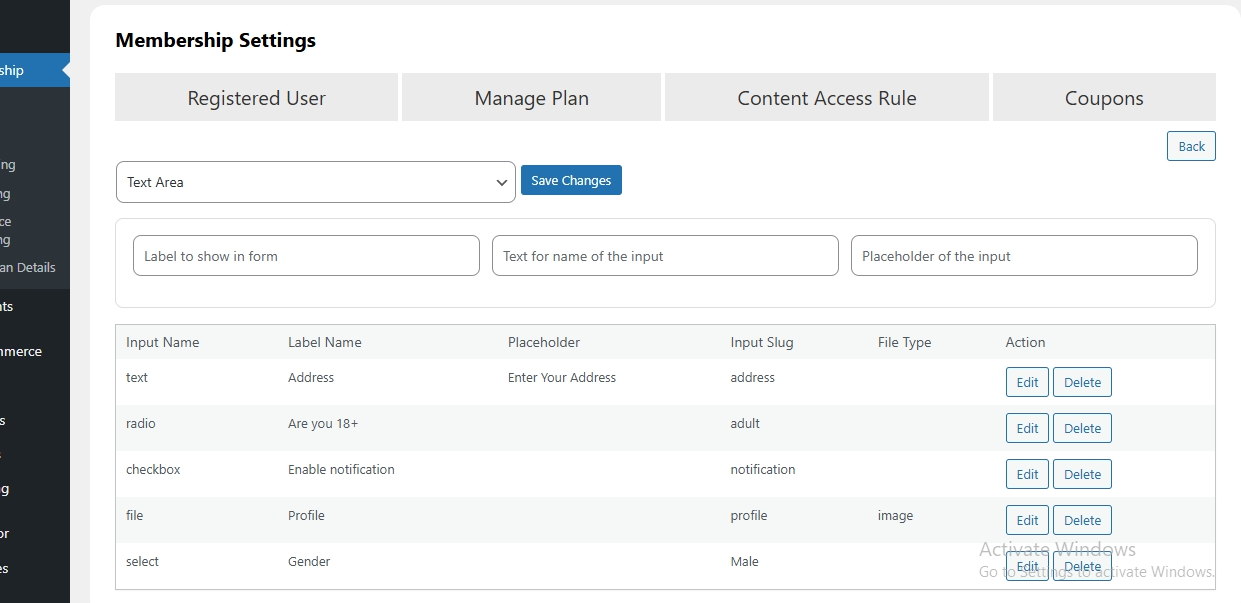
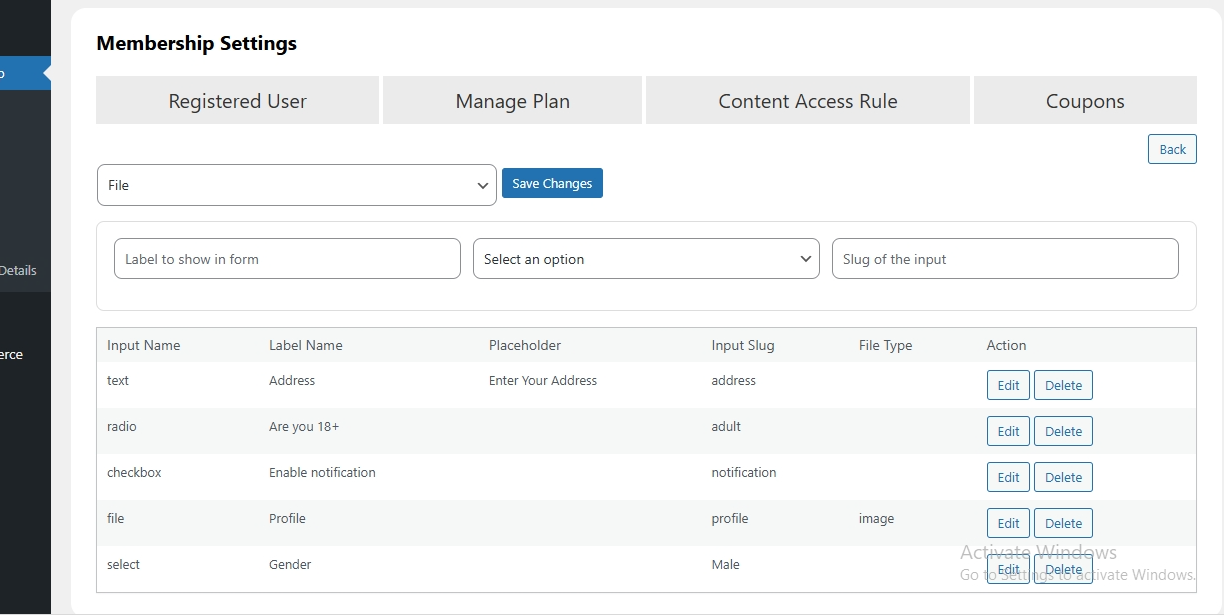
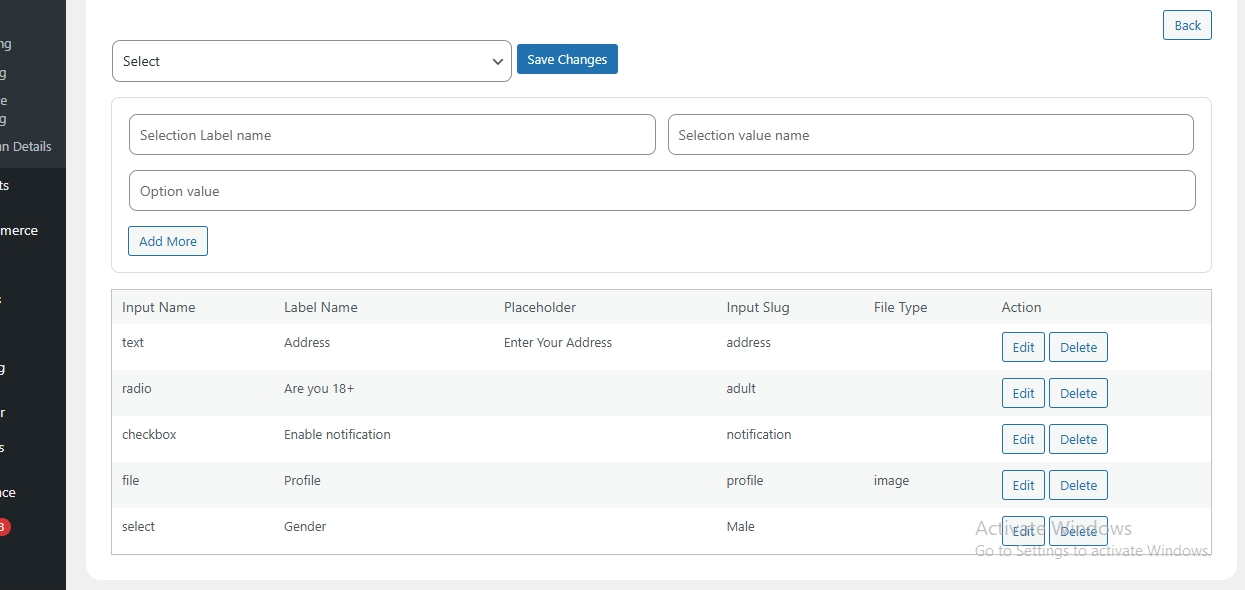
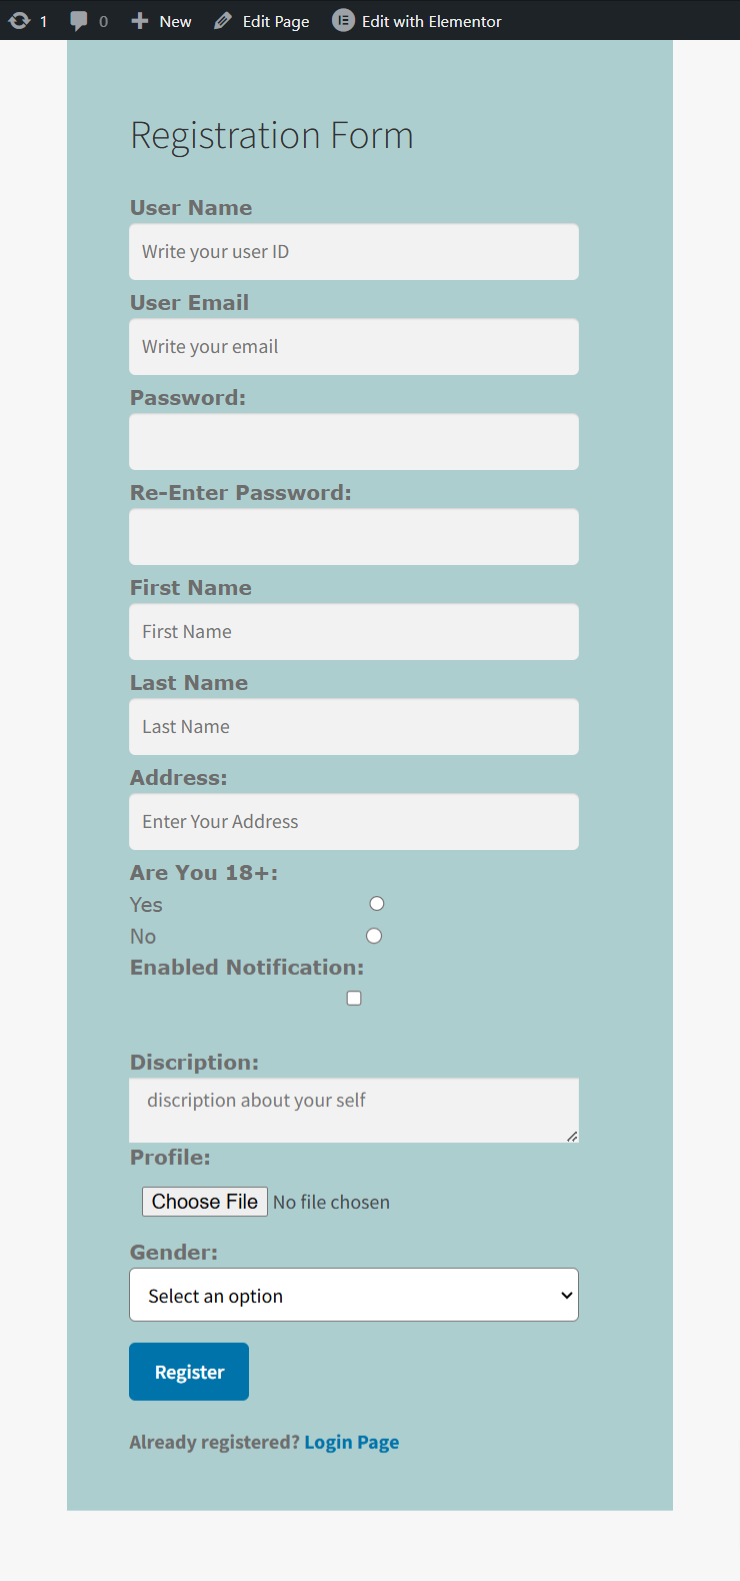
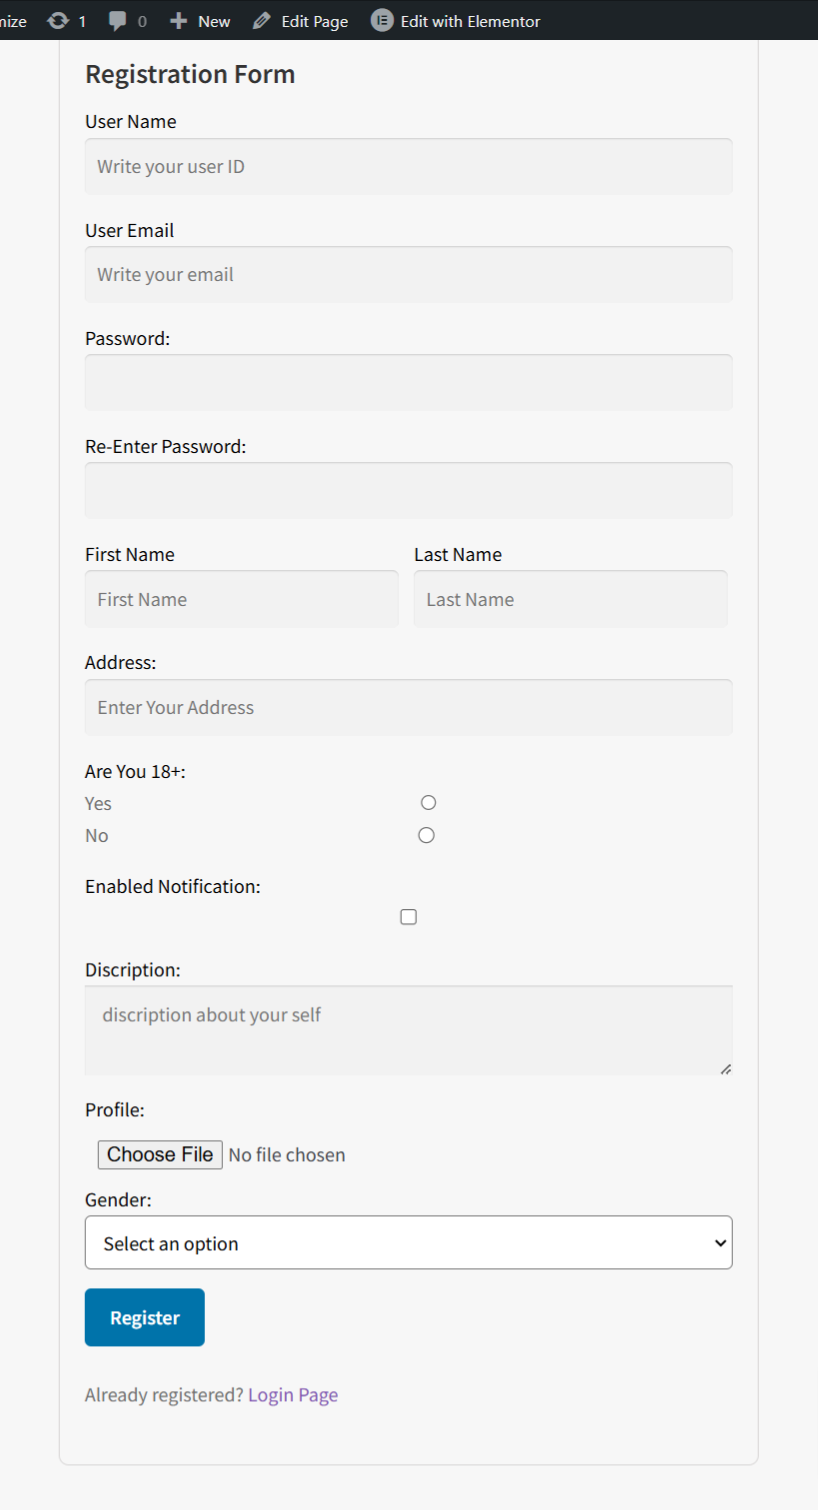
To collect more user data, you can add custom fields to the registration form. Here’s how to do it:
- Add a Custom Field:
- Click on the “Add Custom Field” option.
- Fill in the required information for the new field (e.g., field label, type of input).
- Click “Save Changes” to add the custom field.
- View and Manage Custom Fields:
- After saving, your new custom field will be listed below in the table.
- If you want to make changes to an existing custom field, click the edit option next to the field you wish to modify.
- Remove a Custom Field:
- To delete a custom field, select the delete option in the corresponding row.
This allows you to customize the registration process and gather additional information from users as needed.


Manage Plan #
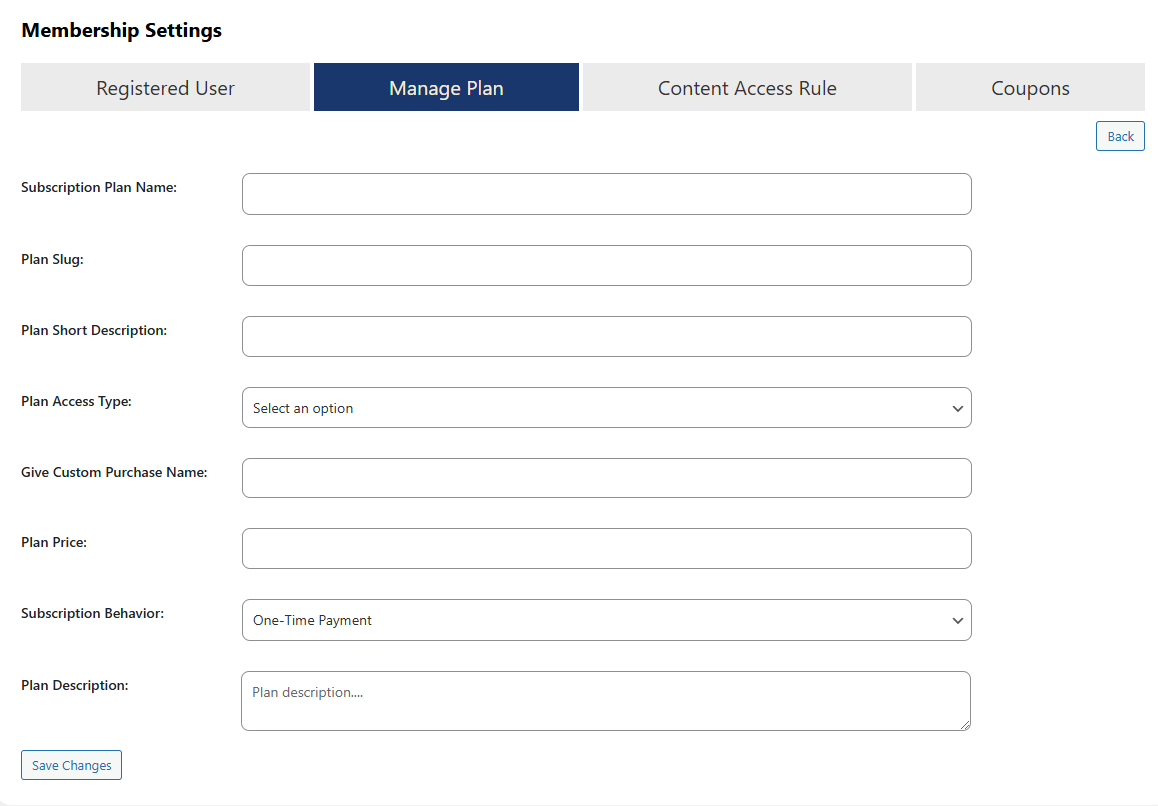
You have the flexibility to create membership plans according to your preferences. To add a new membership plan:
- Add a New Membership Plan:
- Click the “Add New Plan” button.
- Fill in all the necessary fields, such as the plan name, description, pricing, and any other relevant details.
- Save the New Plan:
- Once you’ve completed the form, click “Save Changes.”
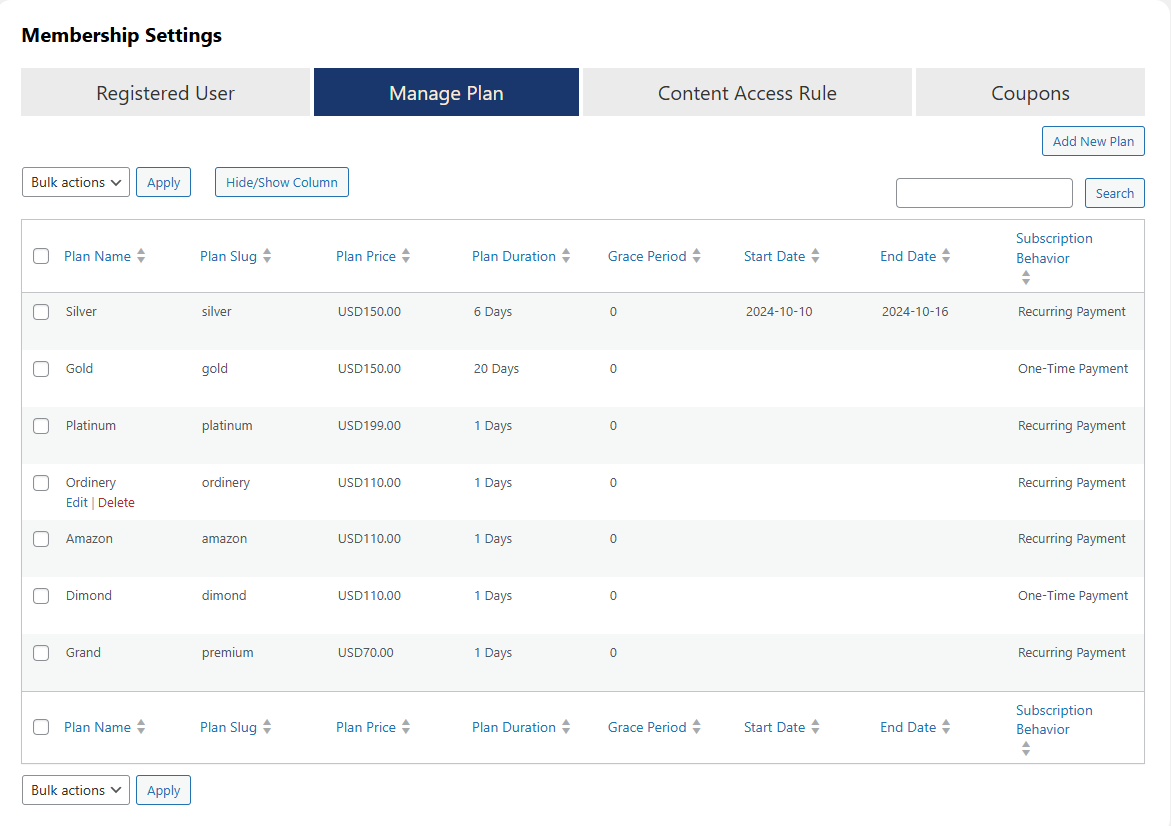
- View the New Membership Plan:
- After saving, the new membership plan will be listed in the table of existing plans.
This feature allows you to tailor membership options to fit the needs of your users and your website.
Content Access Rule #
In the Content Access Rule tab, you can create rules to restrict access to various types of content on your WordPress site.
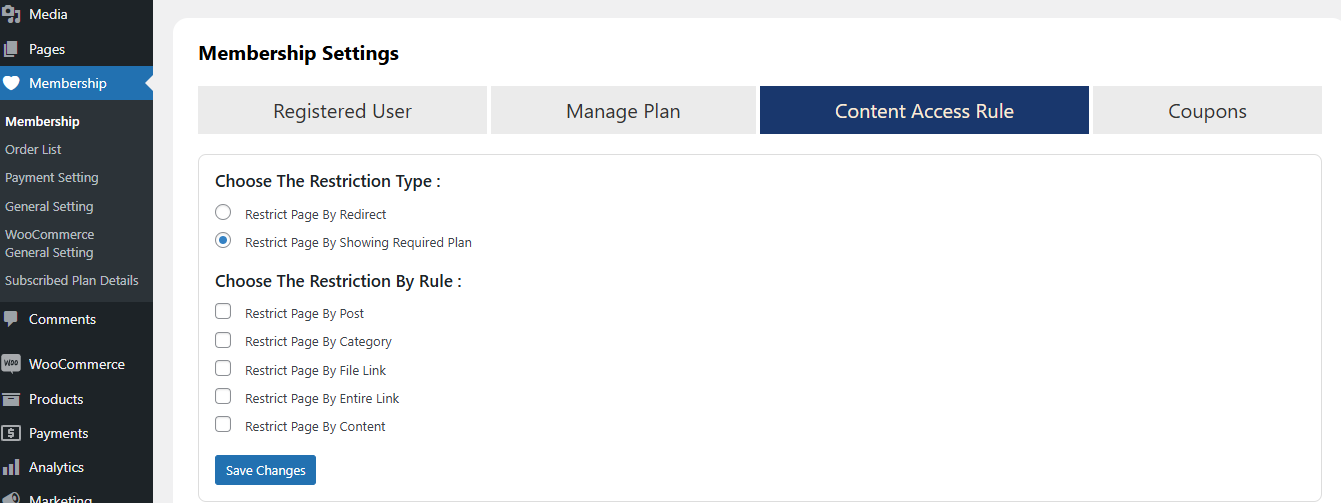
Choose The Restriction Type #
In the Content Access Rule tab, you have two options for managing access to content:
- Redirect Users:
- Choose this option if you want to redirect users to a specific page when they try to access restricted content. This is useful for guiding users to a membership sign-up or information page.
- Show Required Plan:
- Select this option if you want to display the required membership plan for accessing the current content. This way, users will see what plan they need to purchase to view the restricted content.
These options give you flexibility in how you want to handle content access for non-members or users without the appropriate membership level.
Choose The Restriction By Rule #
With these options, you can enable the type of restriction you want to apply for members, then make “Save Changes”.
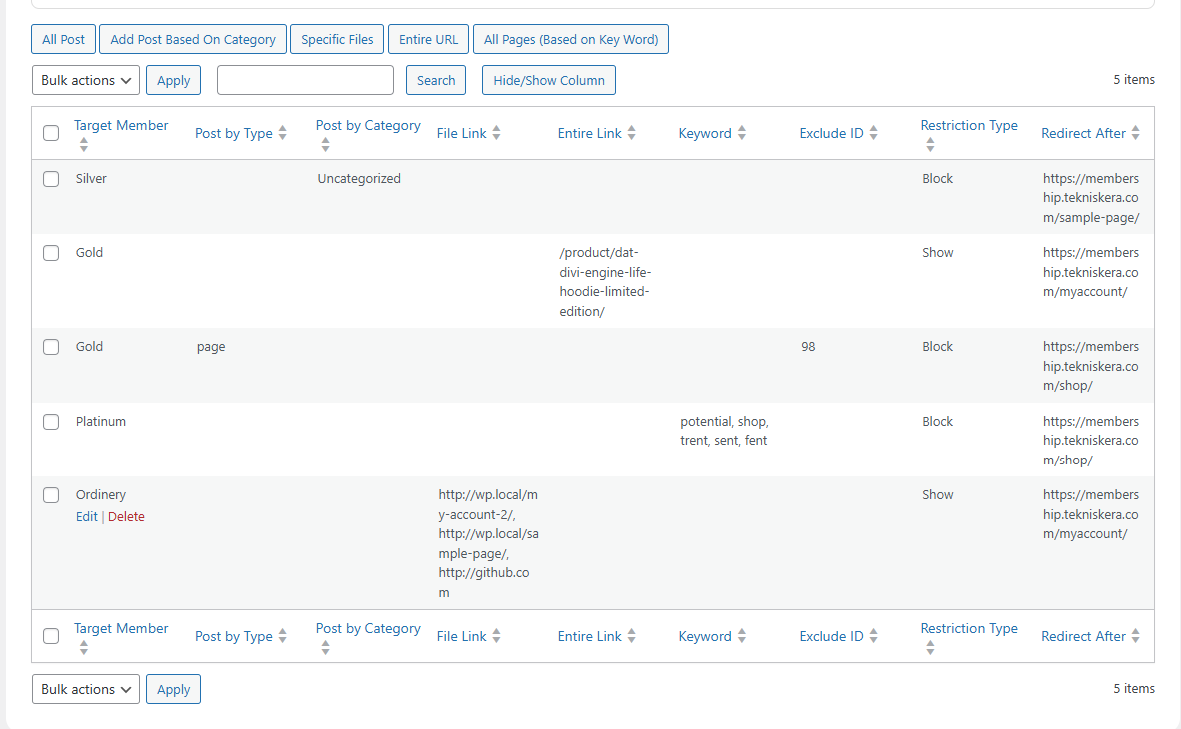
Block All Post By Type #
To block a post by its type, follow these steps:
- Select Post Type: Click on the “All Post” button to specify the type of post you want to restrict.
- Fill in the Value: Enter the necessary information in the provided field, such as the specific post type you wish to block.
- Save Your Changes: Click on the “Save Changes” button to apply the restriction.
This will ensure that the specified post type is blocked from access based on the rules you’ve set.

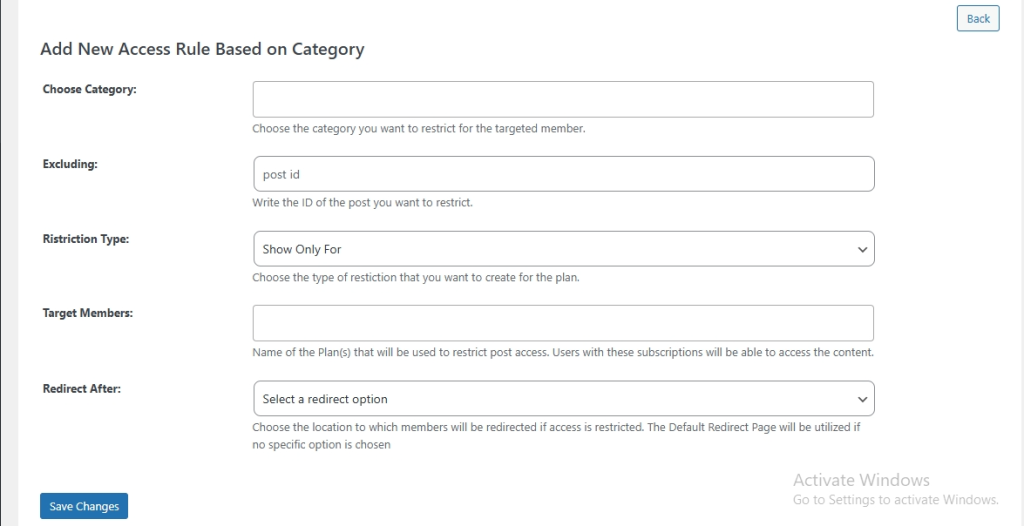
All Post Based On Category #
To block posts by their category, follow these steps:
- Select Category-Based Restriction: Click on the “All Post Based On Category” button to specify that you want to restrict access based on post categories.
- Fill in the Value: Enter the category name or ID in the provided field that you want to block.
- Save Your Changes: Click on the “Save Changes” button to apply the restriction.
This will ensure that all posts within the specified category are blocked from access according to your defined rules.
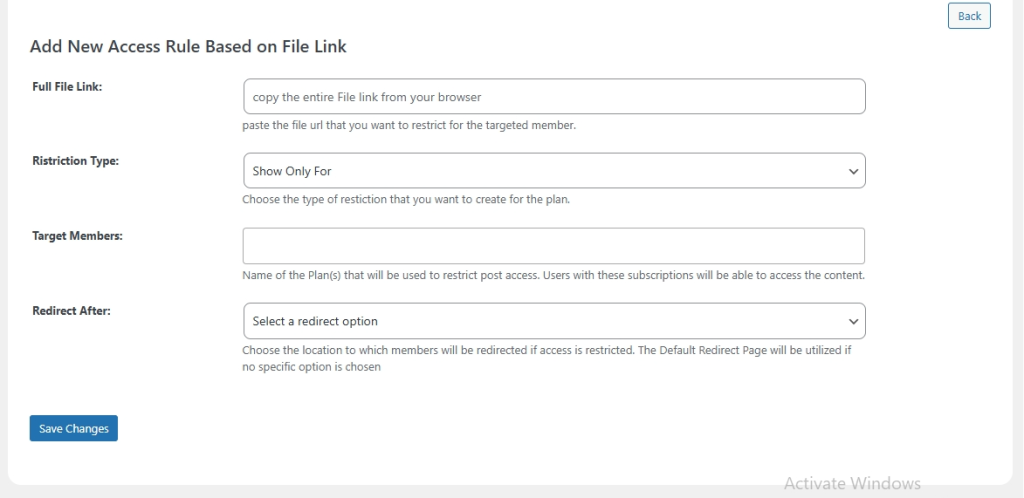
Specific File #
To block access to a specific file by its link, follow these steps:
- Select Specific Files: Click on the “Specific Files” button to indicate that you want to restrict access based on file links.
- Fill in the File Link: Enter the link or URL of the specific file you wish to block in the provided field.
- Save Your Changes: Click on the “Save Changes” button to apply the restriction.
This will ensure that access to the specified file is blocked according to the rules you’ve set.
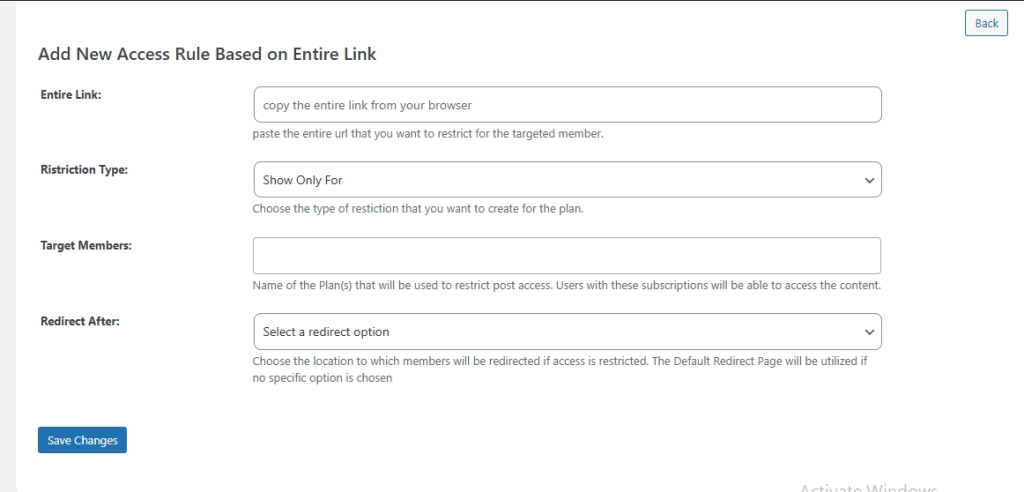
Entire URL #
To block access to a page by its link, follow these steps:
- Select Entire Link: Click on the “Entire Link” button to specify that you want to restrict access based on the full URL of the page.
- Fill in the Page Link: Enter the complete URL of the page you want to block in the provided field.
- Save Your Changes: Click on the “Save Changes” button to apply the restriction.
This will ensure that access to the specified page is blocked according to your defined rules.
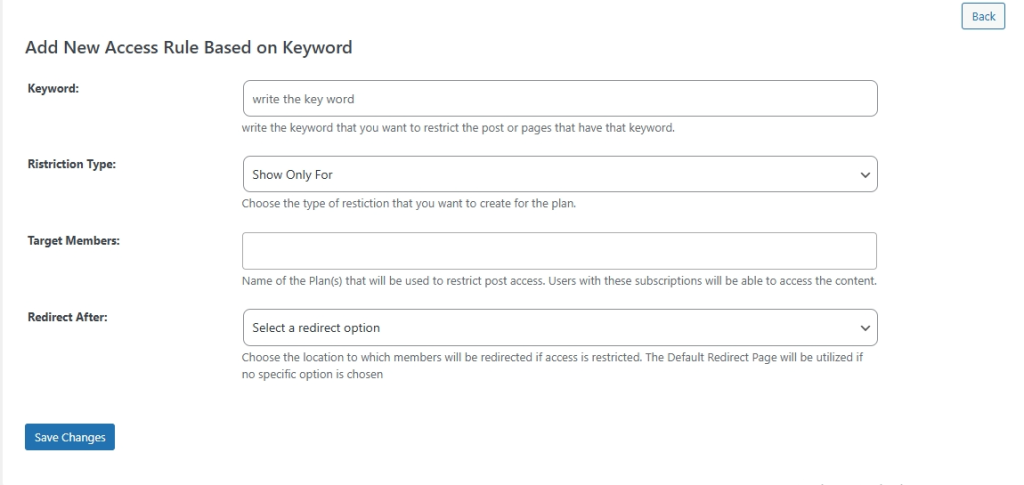
All Pages (Based On Keywords) #
To block access to a page or post based on a keyword, follow these steps:
- Select Keyword-Based Restriction: Click on the “All Pages (Based On Keyword)” button to indicate that you want to restrict access based on specific keywords.
- Fill in the Keyword: Enter the keyword you want to use for blocking access in the provided field. This keyword will apply to all pages or posts that contain it.
- Save Your Changes: Click on the “Save Changes” button to apply the restriction.
This will ensure that any page or post containing the specified keyword is blocked according to the rules you’ve set.
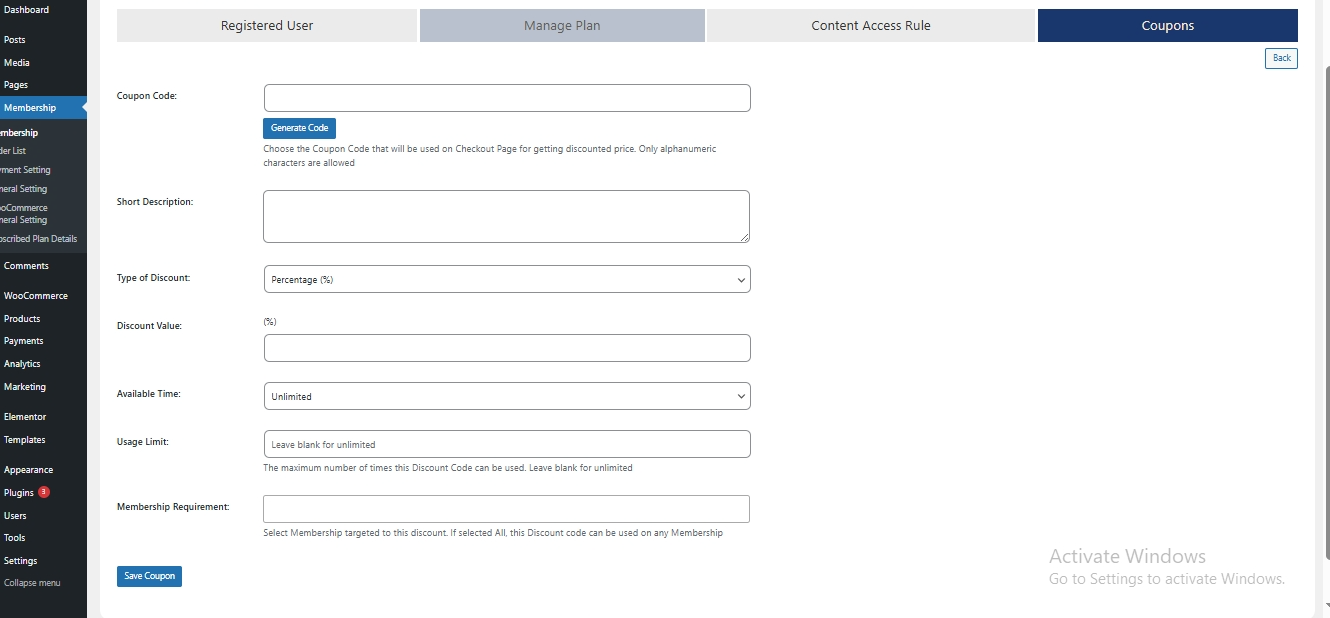
Coupons #
To create a new coupon, follow these steps:
- Add a New Coupon:
- Click on the “Add New Coupon” button.
- Fill in the required fields for the coupon, such as the coupon code, discount type, amount, expiration date, and any usage restrictions.
- Save the Coupon:
- Click on the “Save Changes” button to create the coupon.
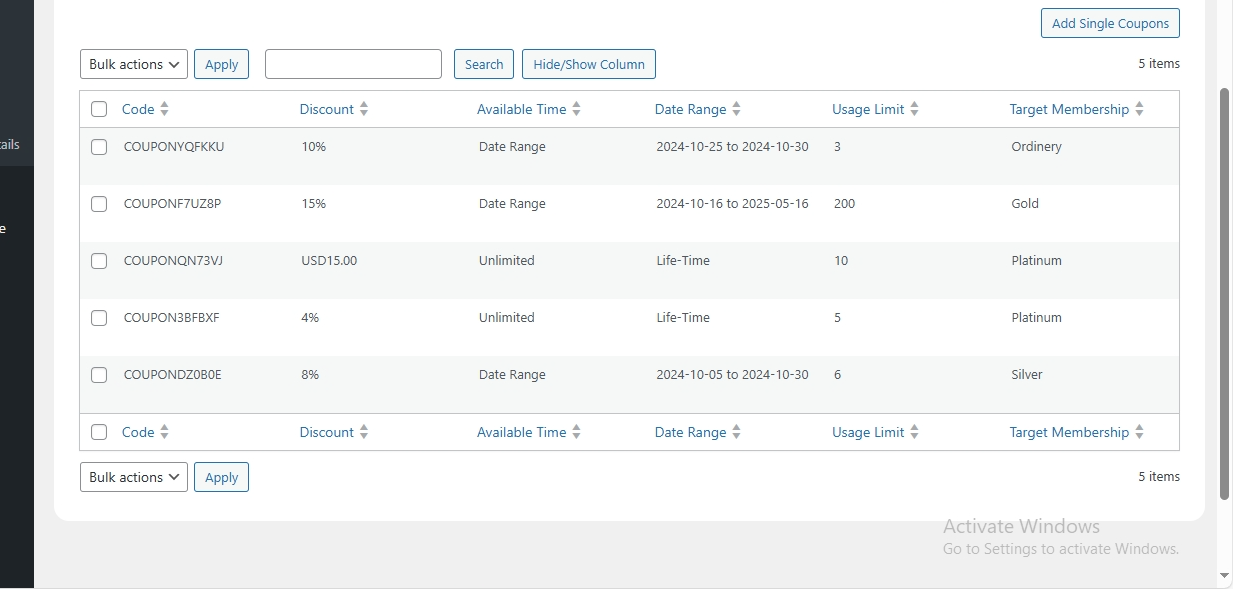
- View and Manage Coupons:
- After saving, the new coupon will be listed in the table.
- To modify an existing coupon, click the edit button next to the coupon you want to change.
- To delete a coupon, click the delete button in the selected row for that coupon.
This process allows you to easily manage discount coupons for your membership plans or products.
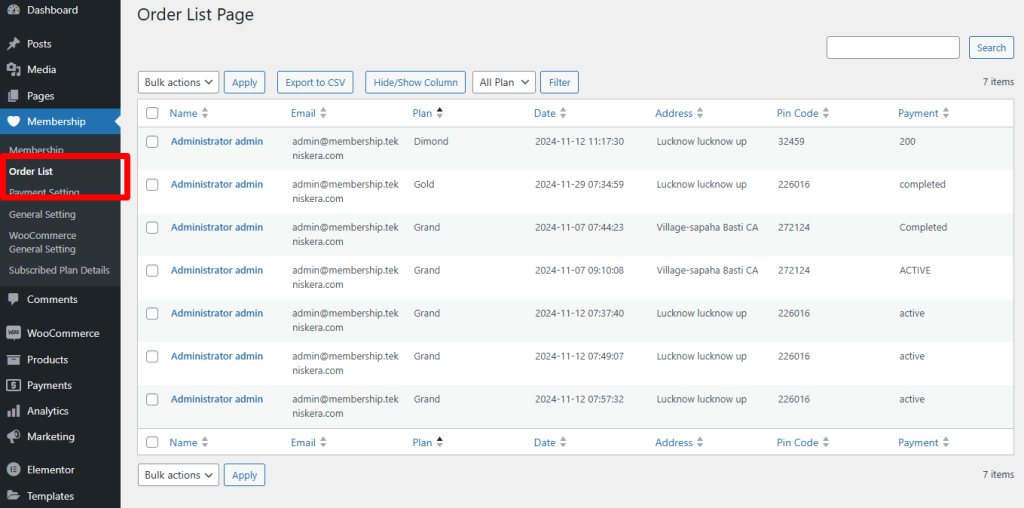
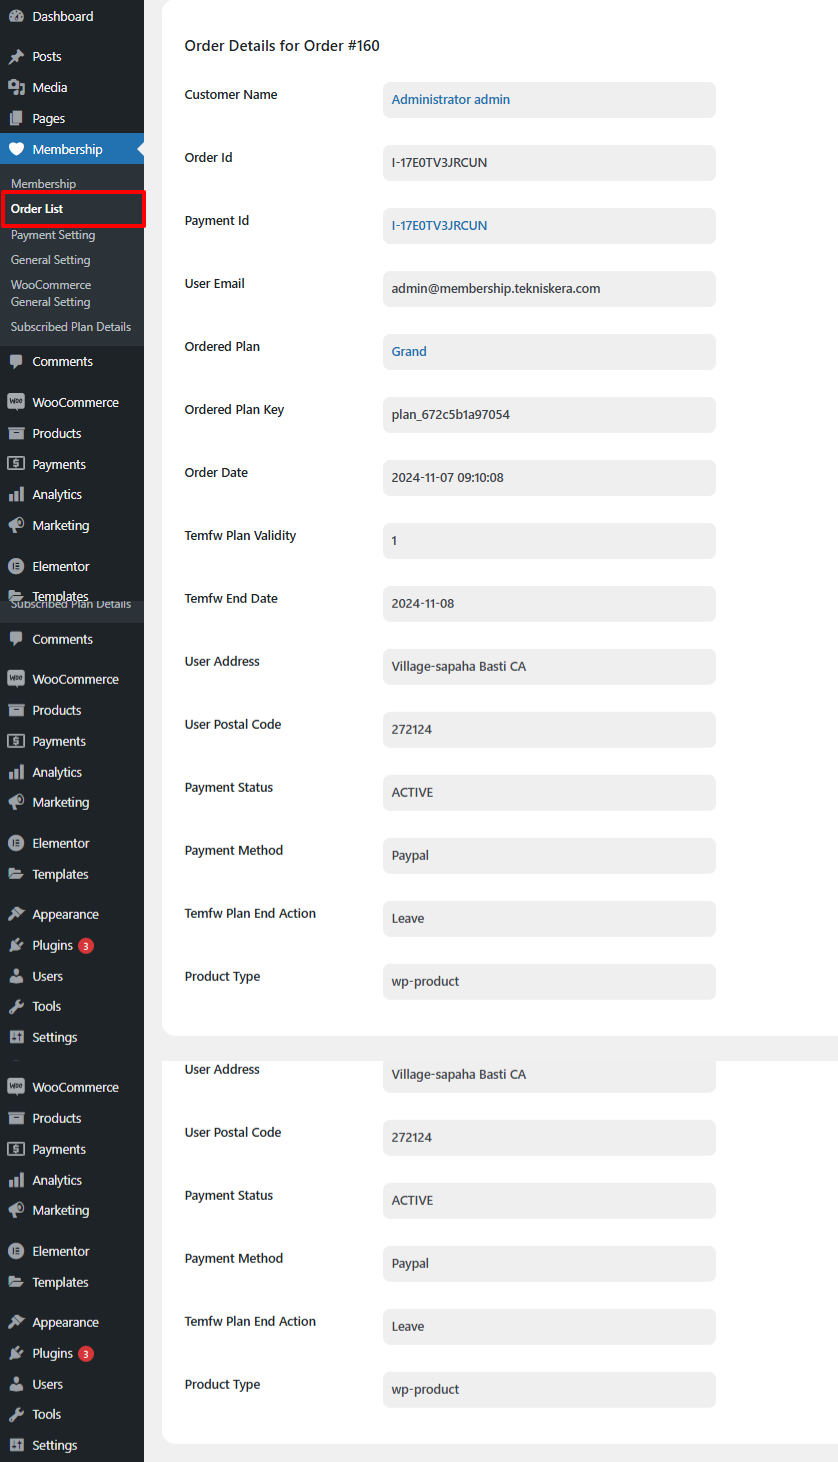
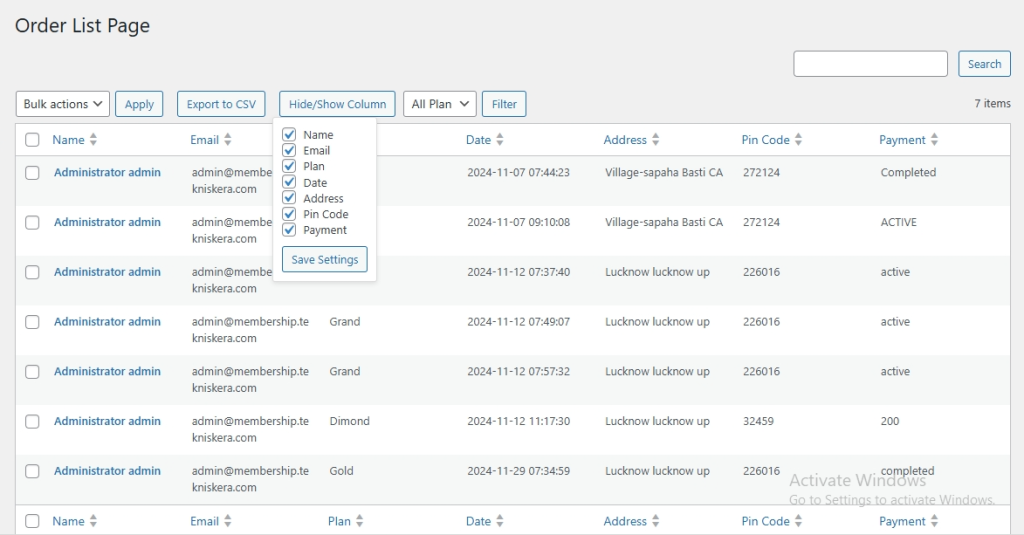
Order List #
In the Orders submenu, you will find all the details related to each order placed by users. Here’s what you can do:
- View Order Details: You can see comprehensive information about each order, including user details, plan details, and payment information.
- Modify Orders:
- You can change various aspects of an order, such as the payment status (e.g., completed, pending, refunded) and the shipping or billing address.
- Delete Orders: If necessary, you have the option to delete an order from the system.
This submenu provides a straightforward way to manage and oversee orders related to your membership plans, ensuring that you can keep track of user transactions and make any required adjustments.
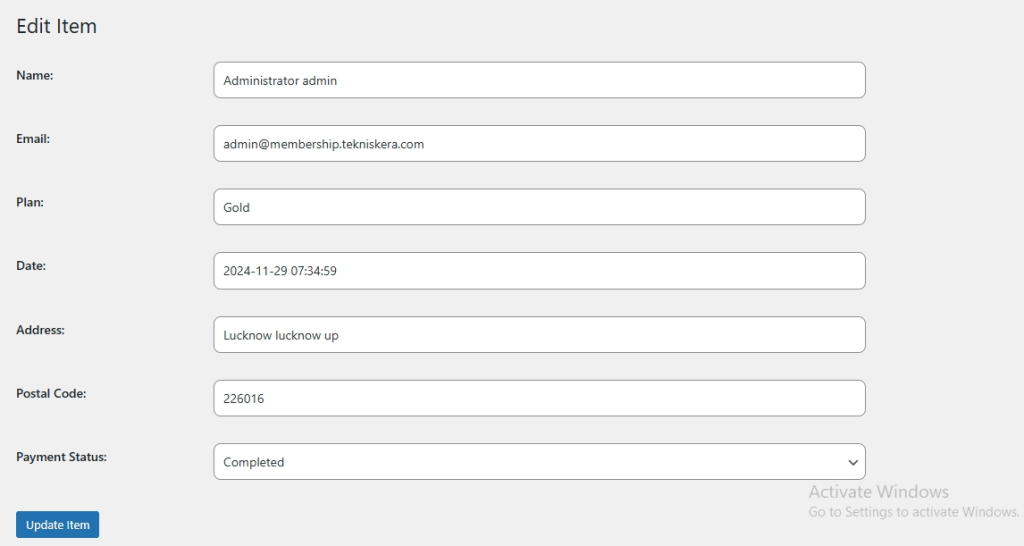
Update Order Status #
To manually mark the payment status of an order made using the ‘Cash On Delivery’ method as ‘Completed’, follow these steps:
- Edit the Order:
- Select the ‘Edit’ option next to the order you wish to modify.
- Change Payment Status:
- Navigate to the ‘Payment Status’ field within the order details.
- Choose ‘Completed’ from the dropdown menu.
- Save Changes:
- Click the ‘Update Item’ button to save the changes.
Once the payment status is updated, the ordered plan will be successfully subscribed by the user who placed the order. This allows you to keep accurate records of payment statuses and user subscriptions.
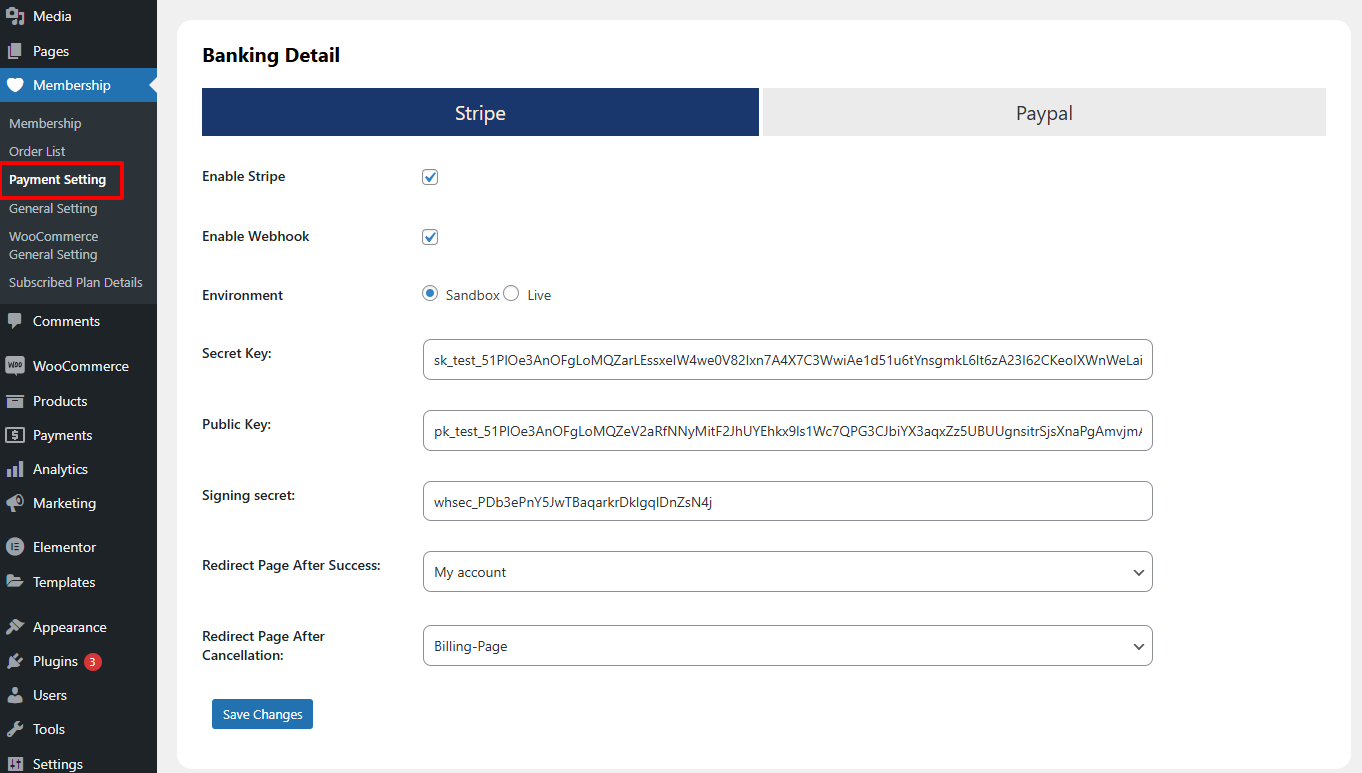
Payment Setting #
For WordPress products sold through your site, Stripe and PayPal payment gateways are integrated to facilitate transactions. Here’s how it works:
- Payment Gateway Options: Admins can choose to enable either Stripe or PayPal as the payment method for processing transactions.
- Fill in Required Fields: To complete the payment setup through these gateways, the admin must fill in all necessary fields, such as:
- API keys for Stripe or PayPal.
- Any required merchant information.
- Configuration settings for payment processing.
- Complete the Payment: Once the fields are filled out and saved, customers can make payments for their WordPress products using the selected payment gateway during the checkout process.
This integration ensures that users have flexible and secure options for making payments on your site.

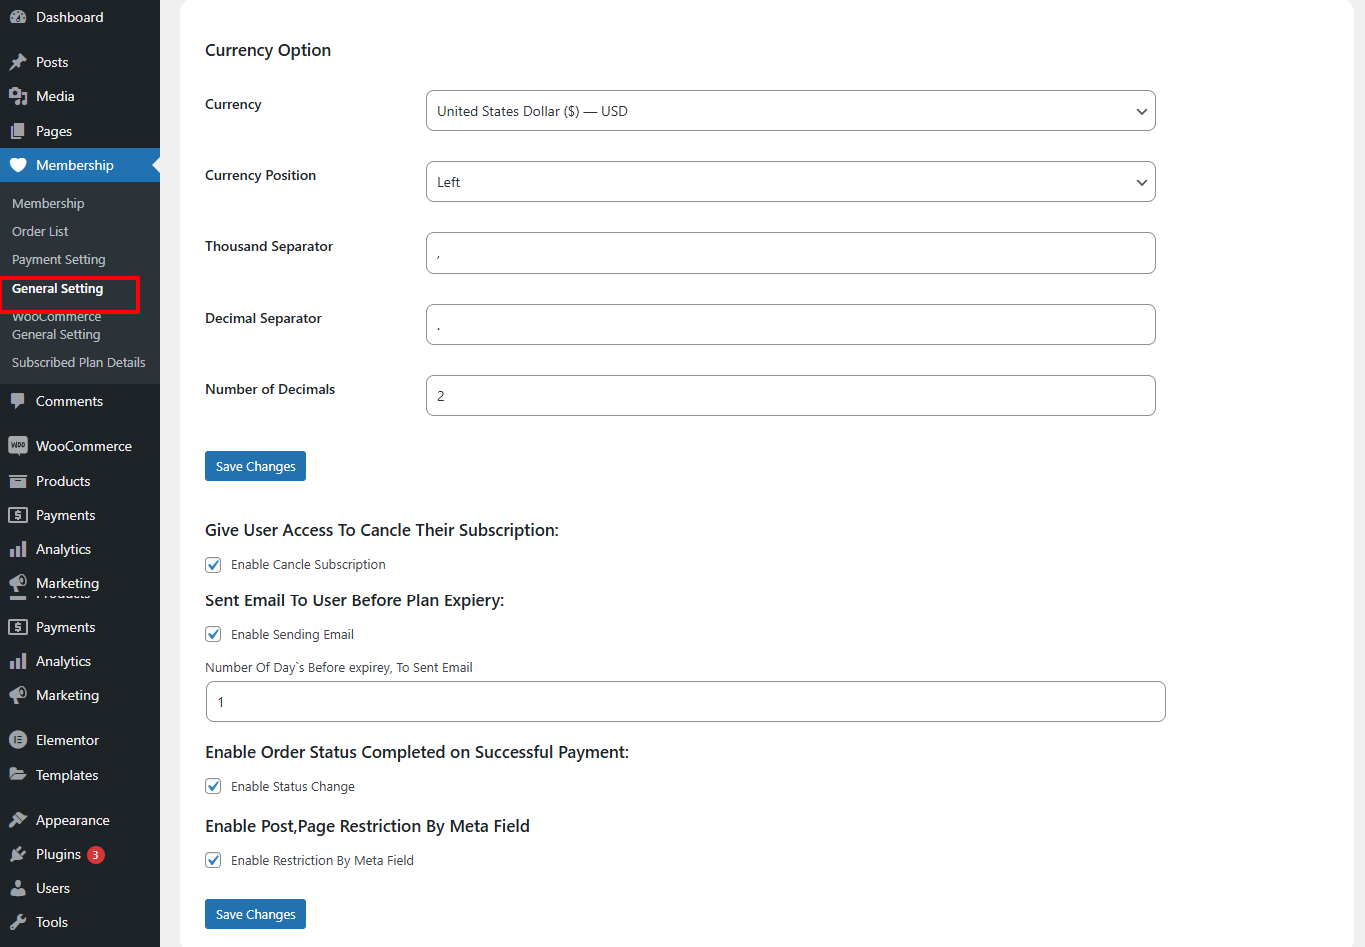
General Setting #
To set the currency for payments in your WordPress products, follow these steps:
- Choose Currency: Select the desired currency from the dropdown menu or available options according to your business needs.
- Enable Additional Options: If there are more settings related to currency or payment options, configure them as needed.
- Enable User To Cancle Their Subscription: On enabling the cancle subscription, users are allowed to cancle their subscription accordingly.
- Save Your Changes: Click on the “Save Changes” button to apply your selected currency and any additional settings.
By doing this, you ensure that transactions are processed in the correct currency, providing clarity and convenience for your customers during checkout.
WooCommerce General Setting #
To restrict WooCommerce products from appearing on the shop page based on Product Type, Category, or Tags, follow these steps:
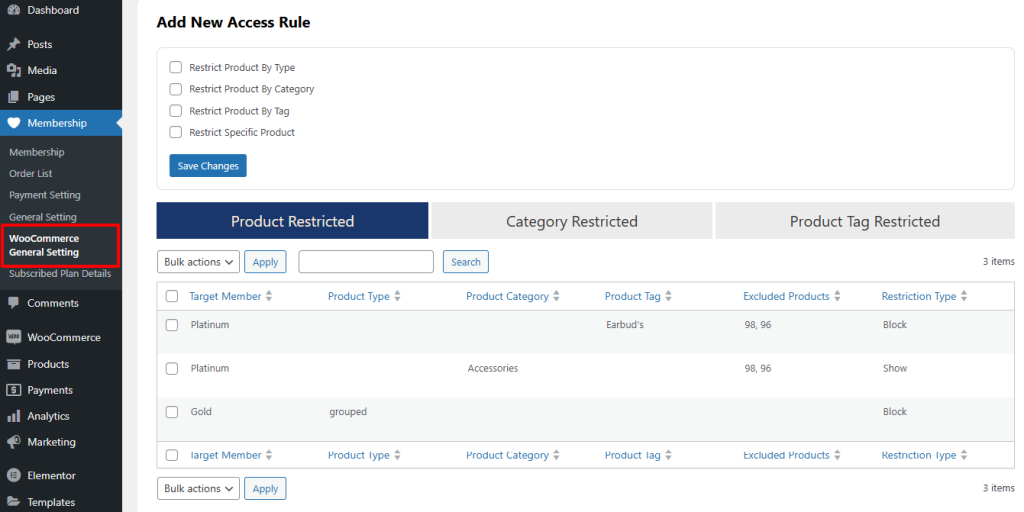
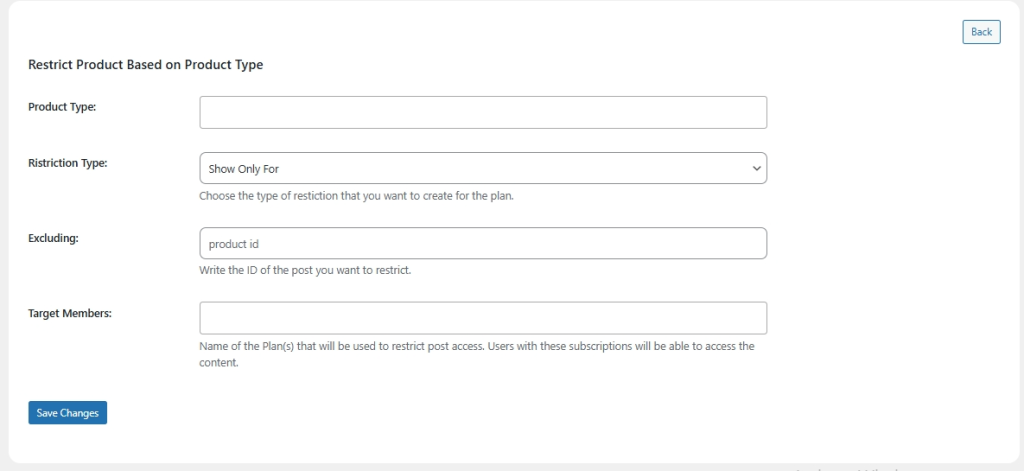
Restrict Product By Type #
To restrict products based on their type, follow these steps:
- Select Restriction Type:
- Click on the “Restrict Product By Type” button.
- Fill in the Form Fields:
- Enter the necessary information in the provided fields, such as selecting the specific product type you want to restrict.
- Save Your Changes:
- Click on the “Save Changes” button to apply the restriction.
This will ensure that products of the specified type are restricted from being listed on the shop page according to your defined rules.
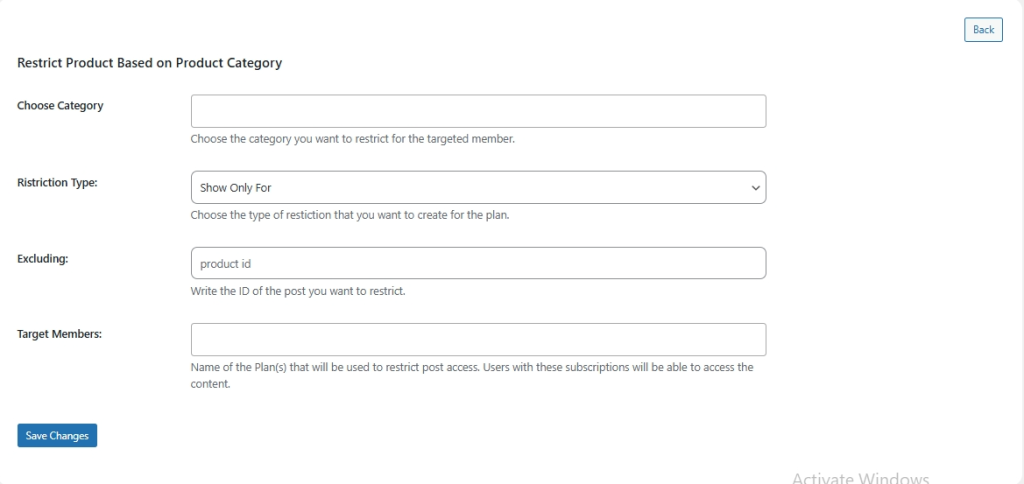
Restrict Product By Category #
To restrict products based on their category, follow these steps:
- Select Restriction by Category:
- Click on the “Restrict Product By Category” button.
- Fill in the Form Fields:
- Enter the necessary information in the provided fields, such as selecting the specific category you want to restrict.
- Save Your Changes:
- Click on the “Save Changes” button to apply the restriction.
This will ensure that products within the specified category are restricted from being displayed on the shop page according to your defined rules.
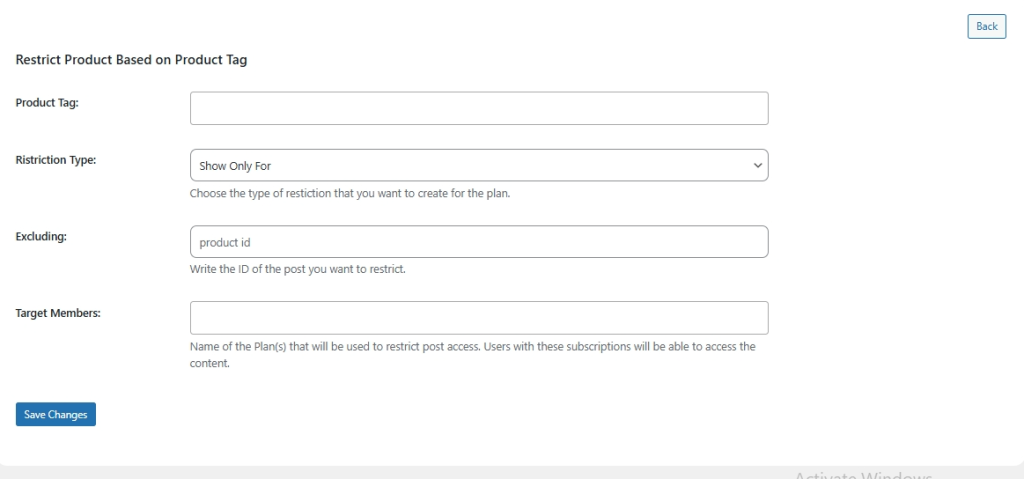
Restrict Product By Tags #
To restrict products based on their tags, follow these steps:
- Select Restriction by Tags:
- Click on the “Restrict Product By Tags” button.
- Fill in the Form Fields:
- Enter the necessary information in the provided fields, such as selecting the specific tags you want to restrict.
- Save Your Changes:
- Click on the “Save Changes” button to apply the restriction.
This process will ensure that products associated with the specified tags are restricted from being displayed on the shop page according to your defined rules.
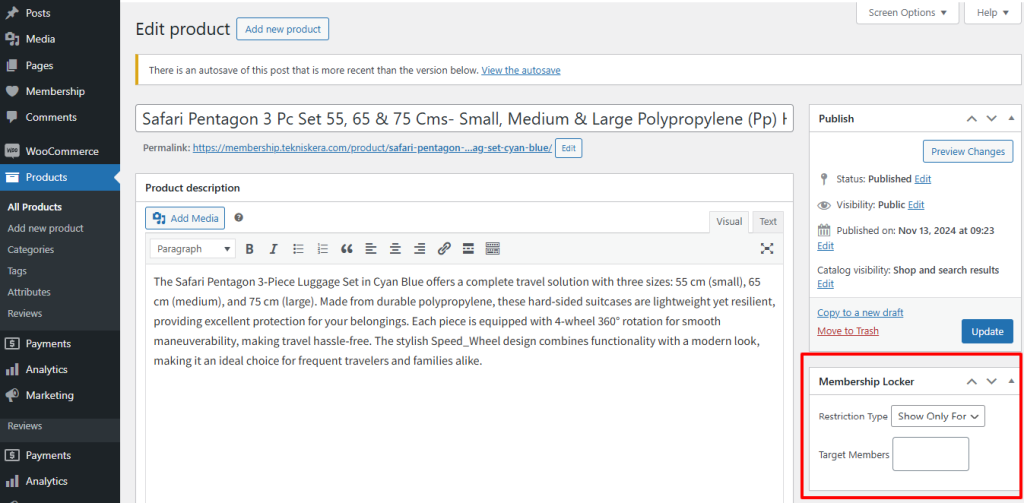
Restrict Specific Product #
In the Add New or Edit Product page, you can manage meta tags to restrict specific products for certain membership levels. Here’s how to do it:
- Access Meta Tags:
- When adding or editing a product, look for the meta tags section related to membership restrictions. This may be labeled as “Membership Restriction” or something similar.
- Add Restrictions:
- Select the appropriate meta tags that correspond to the specific membership levels you want to restrict the product to. This could include options like:
- Restriction Type: Specify the type of restriction (e.g., only available to premium members).
- Target Members: Select which membership level(s) can access the product.
- Select the appropriate meta tags that correspond to the specific membership levels you want to restrict the product to. This could include options like:
- Save Changes:
- After setting the necessary meta tags, make sure to click the “Update” or “Publish” button to save your changes.
By using these meta tags, you can control access to products based on user membership levels, ensuring that only eligible members can view or purchase restricted items.
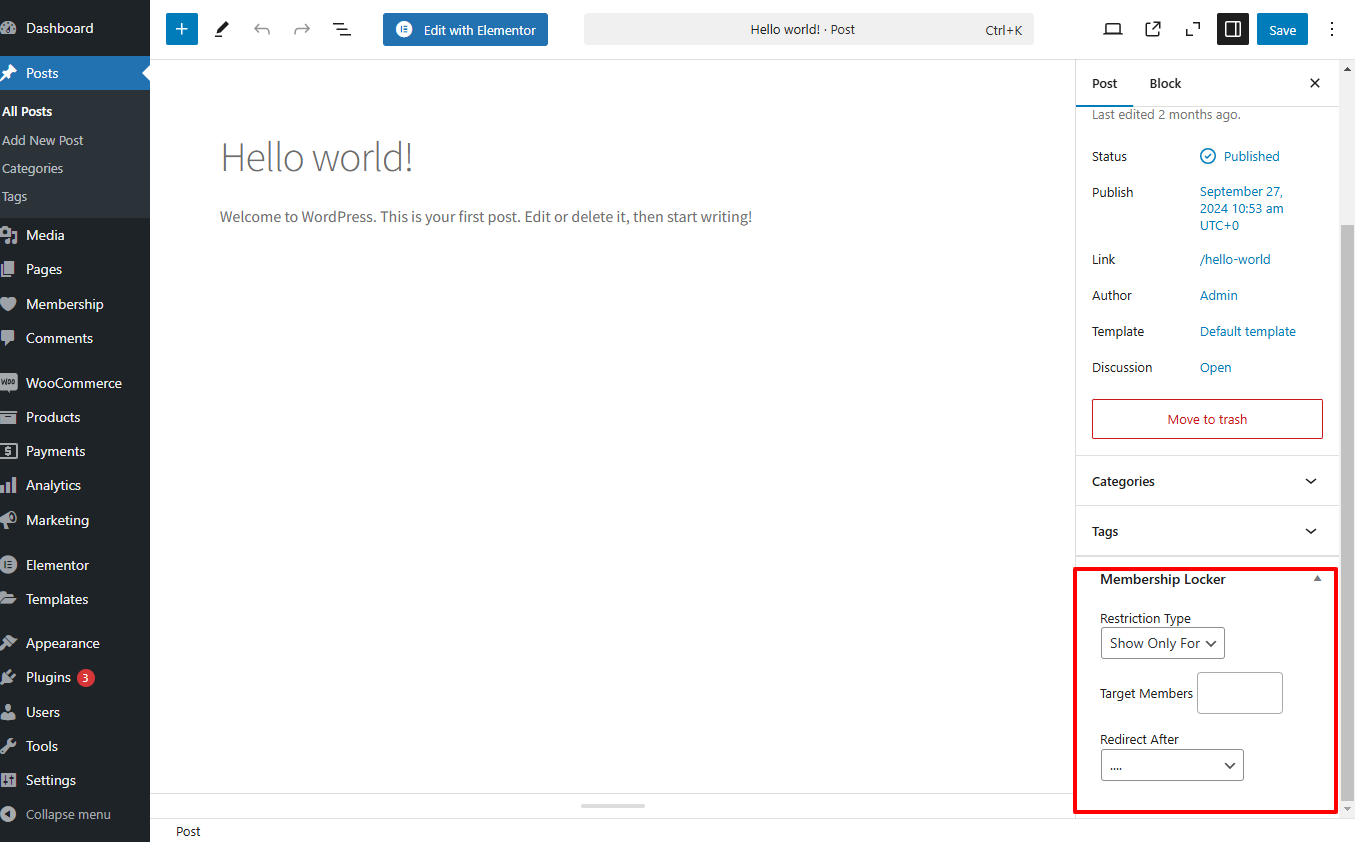
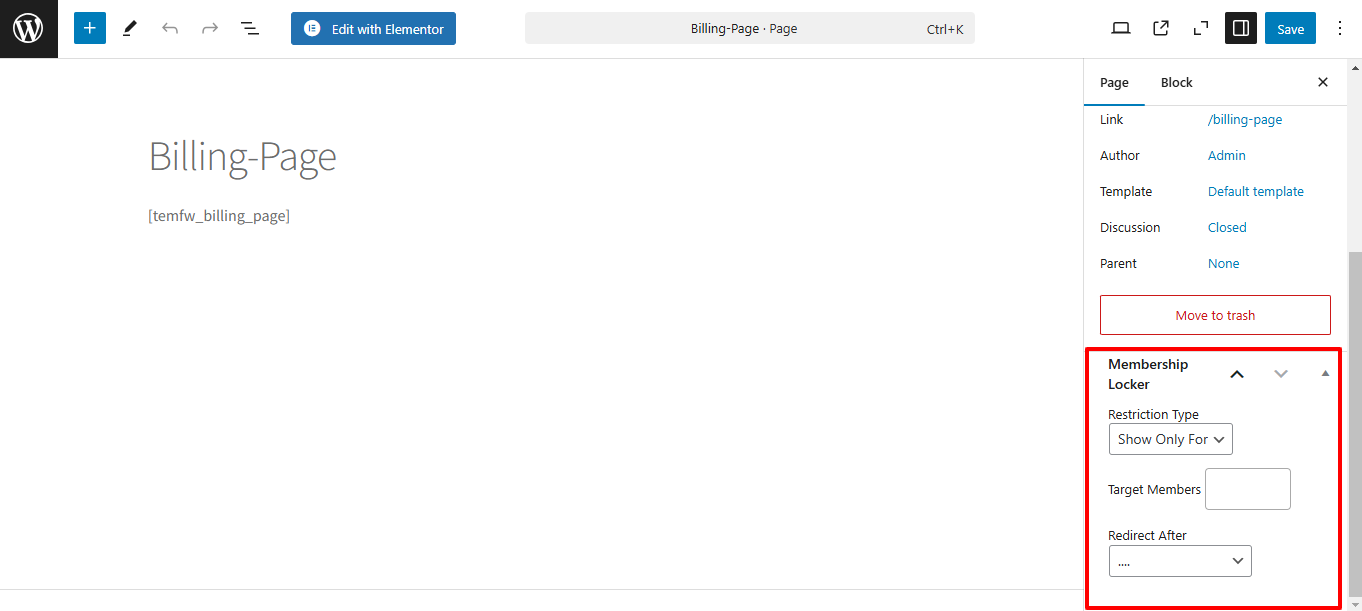
Restrict Specific Page And Post #
Both Products, Posts, and Pages can be restricted using the Membership Locker meta fields tailored for specific membership levels. Here’s how this works:
- Access the Meta Fields:
- When adding or editing a Product, Post, or Page, look for the Membership Locker section or similar meta fields.
- Set Up Restrictions:
- Choose Restriction Type: Select the type of restriction you want to apply. This may include options such as:
- Restrict Access: Specify which membership levels can access the content.
- Redirect Options: Decide where to redirect users who don’t have access.
- Target Members: Indicate the specific membership levels that are allowed to view the content.
- Choose Restriction Type: Select the type of restriction you want to apply. This may include options such as:
- Save Changes:
- Once you have configured the restrictions, click the “Update” or “Publish” button to apply your settings.
Using the Membership Locker meta fields allows you to effectively control who can access specific products, posts, or pages based on their membership status, enhancing the security and exclusivity of your content.
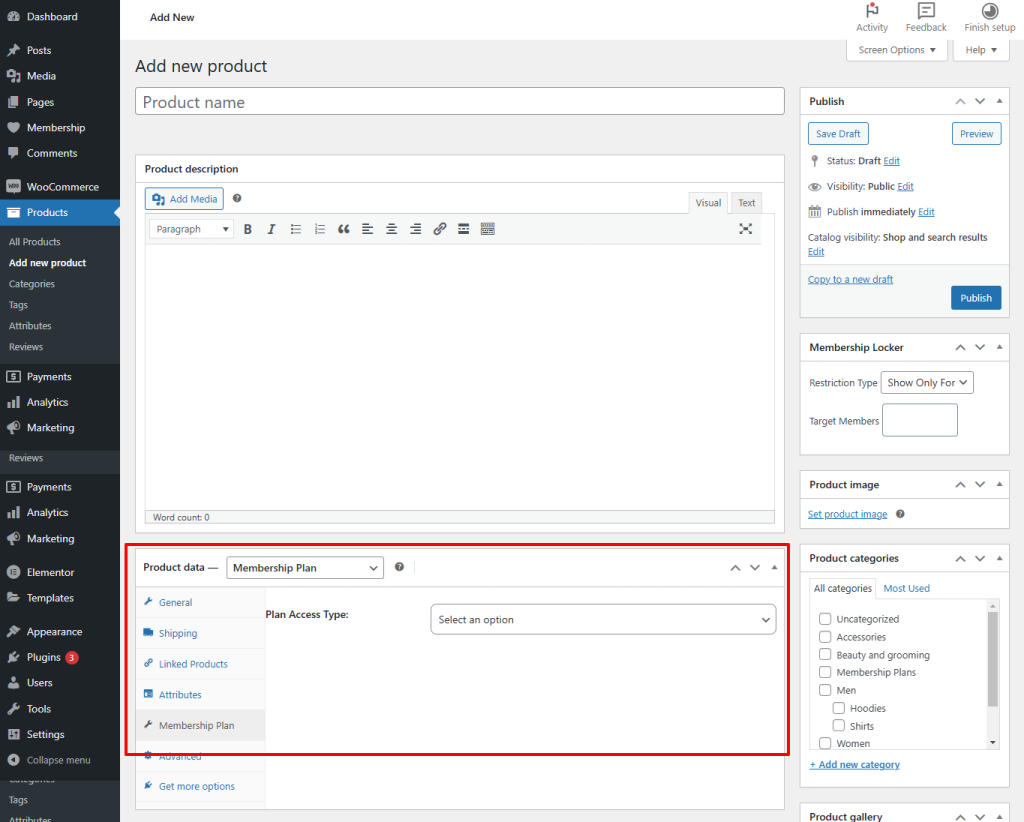
Create Plan as WooCommerce Product #
You can create a Membership Plan as a WooCommerce product by following these steps:
- Add or Edit Product:
- Go to the WooCommerce product page and click on “Add New Product” or select an existing product to “Edit”.
- Select Product Type:
- In the product settings, choose “Membership Plan” from the product type dropdown.
- Fill in Membership Plan Details:
- Open the “Membership Plan” tab in the tab panel.
- Complete all the necessary fields, such as plan name, description, pricing, duration, and any restrictions.
- Publish the Product:
- Once you’ve filled in all the required information, click on the “Publish” button.
Now, your newly created membership plan will be listed on the WooCommerce Shop page, allowing users to purchase it directly. This integration helps streamline the sale of membership plans alongside your other products.
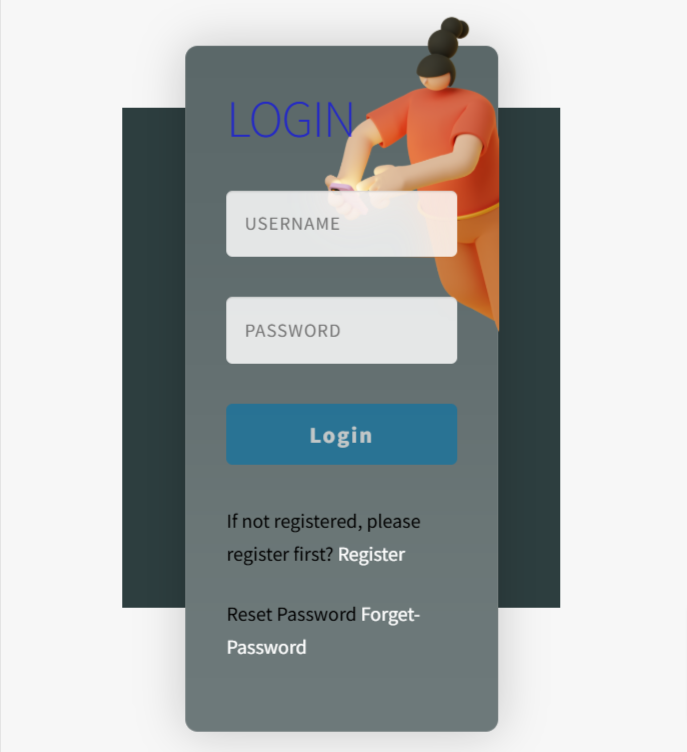
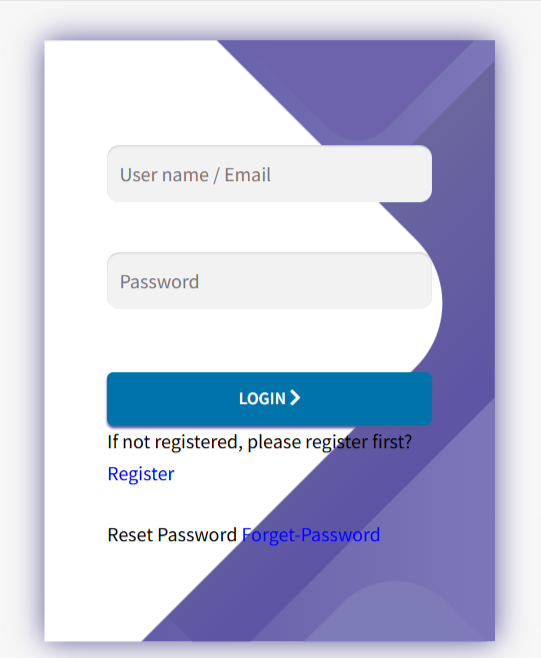
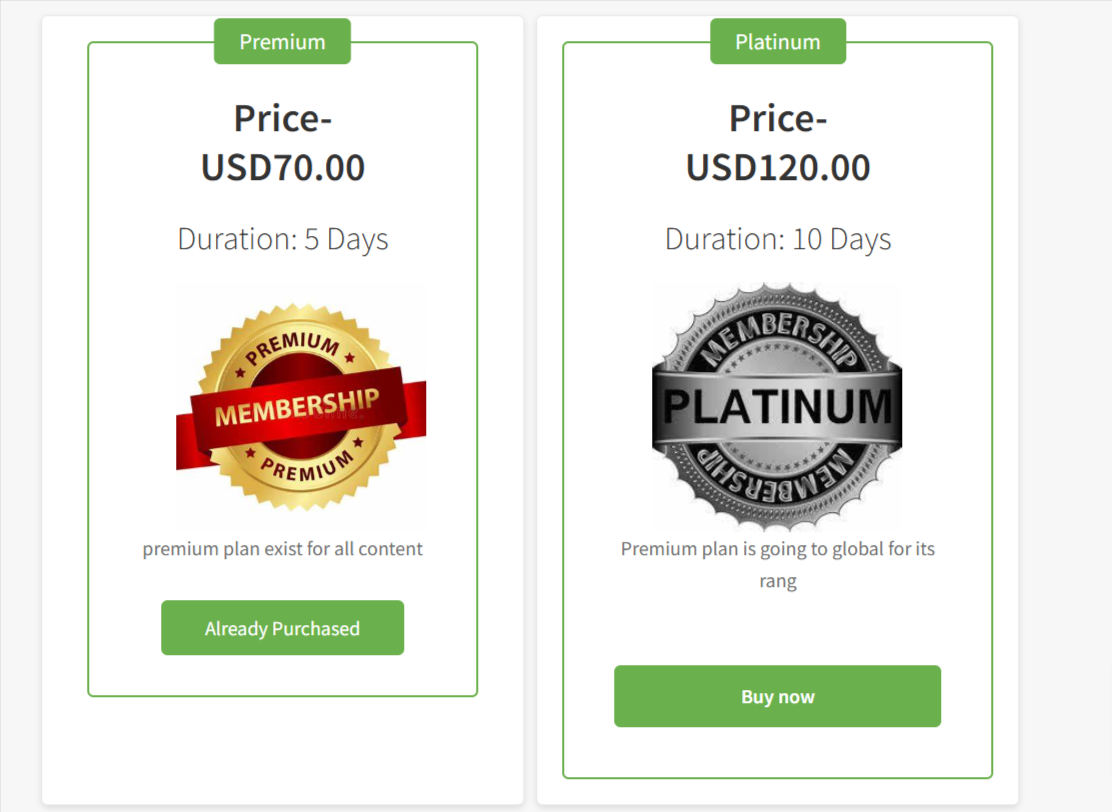
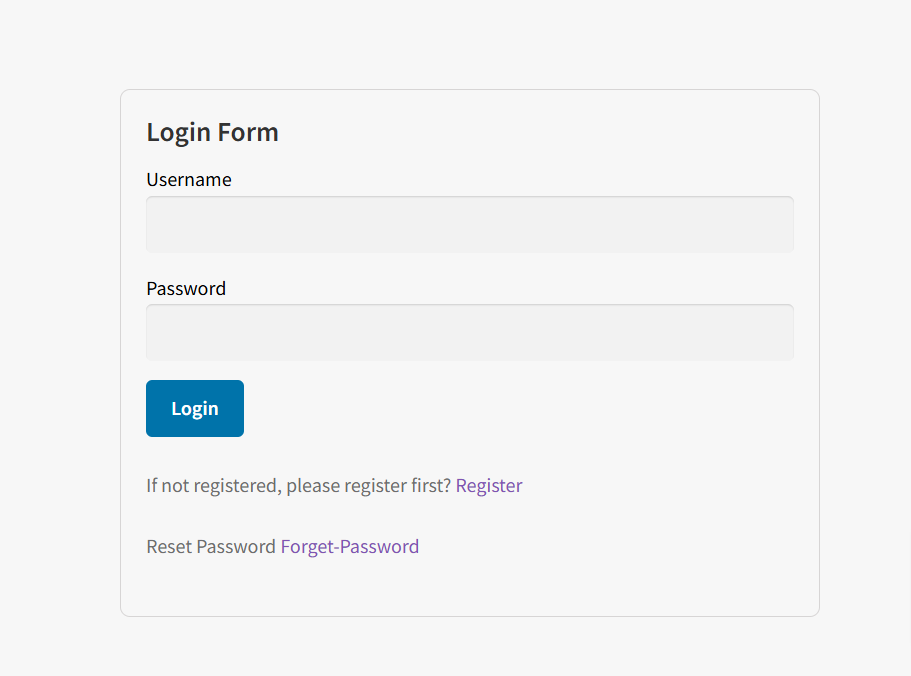
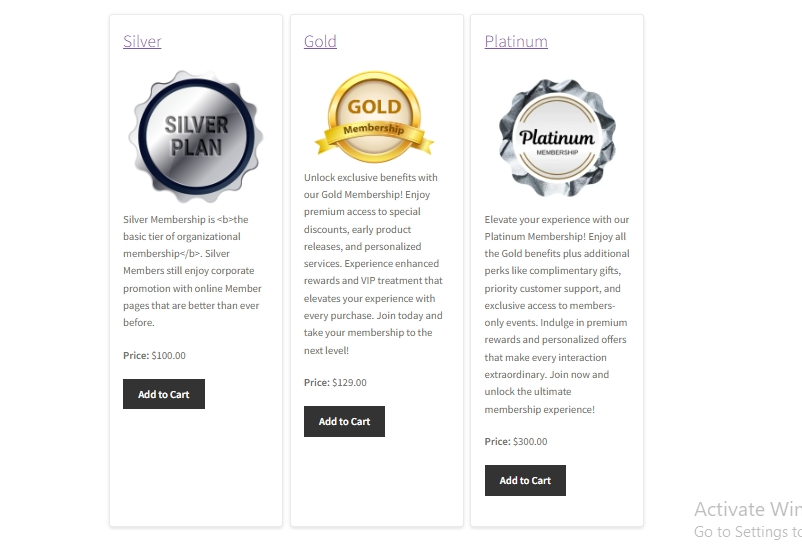
Select Templates to Show #
You can select the specific template to show the subscription plans, registration form, and login form from the option ‘Select Template‘.
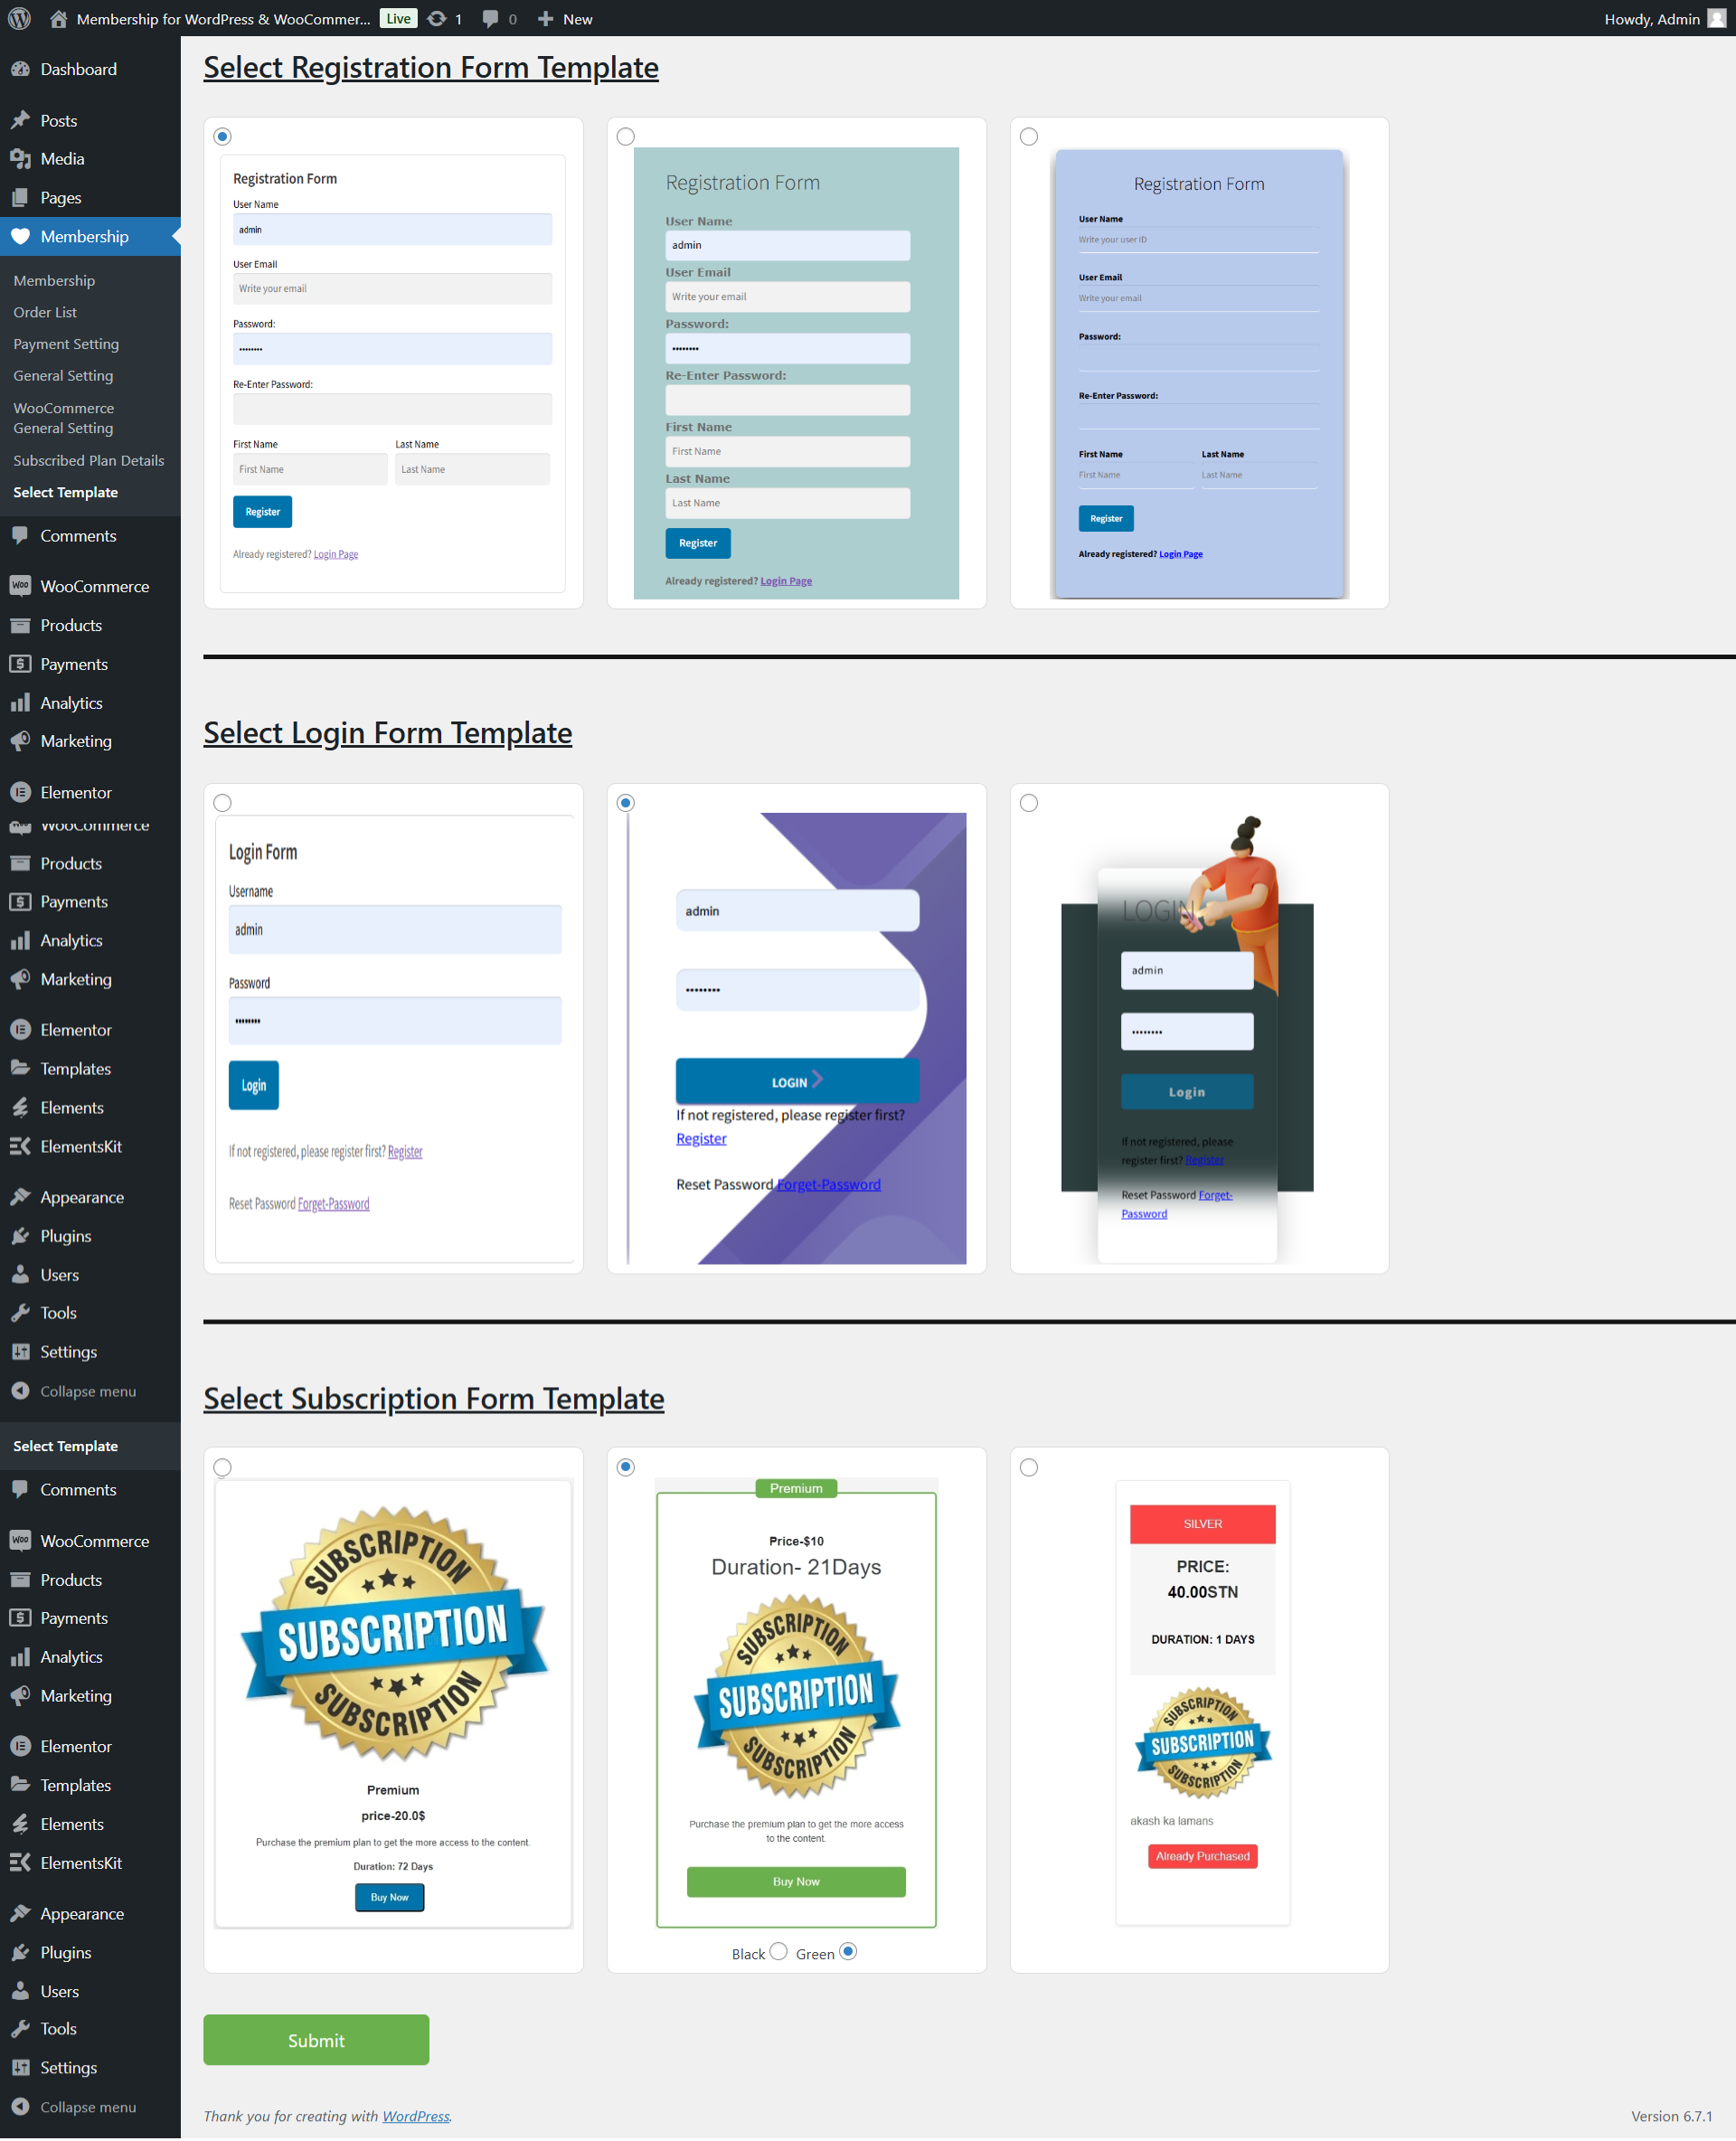
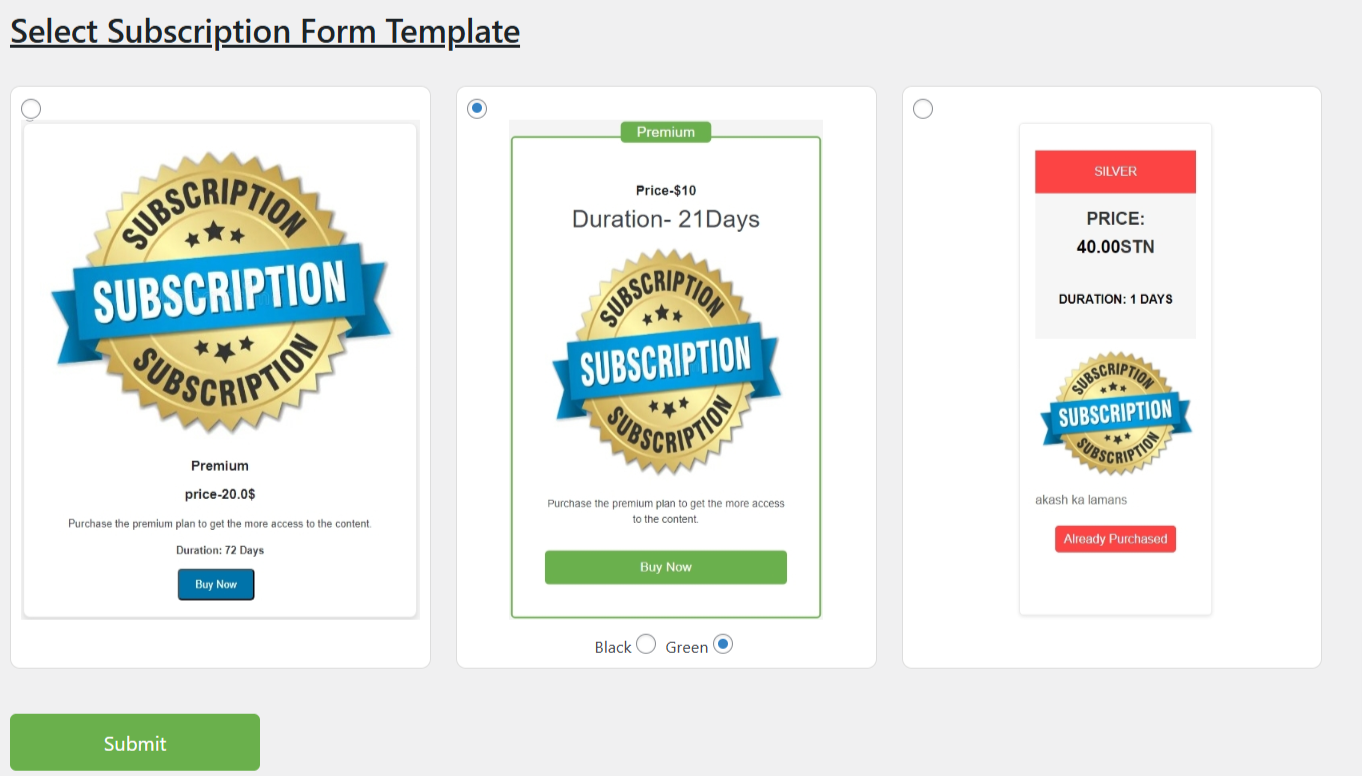
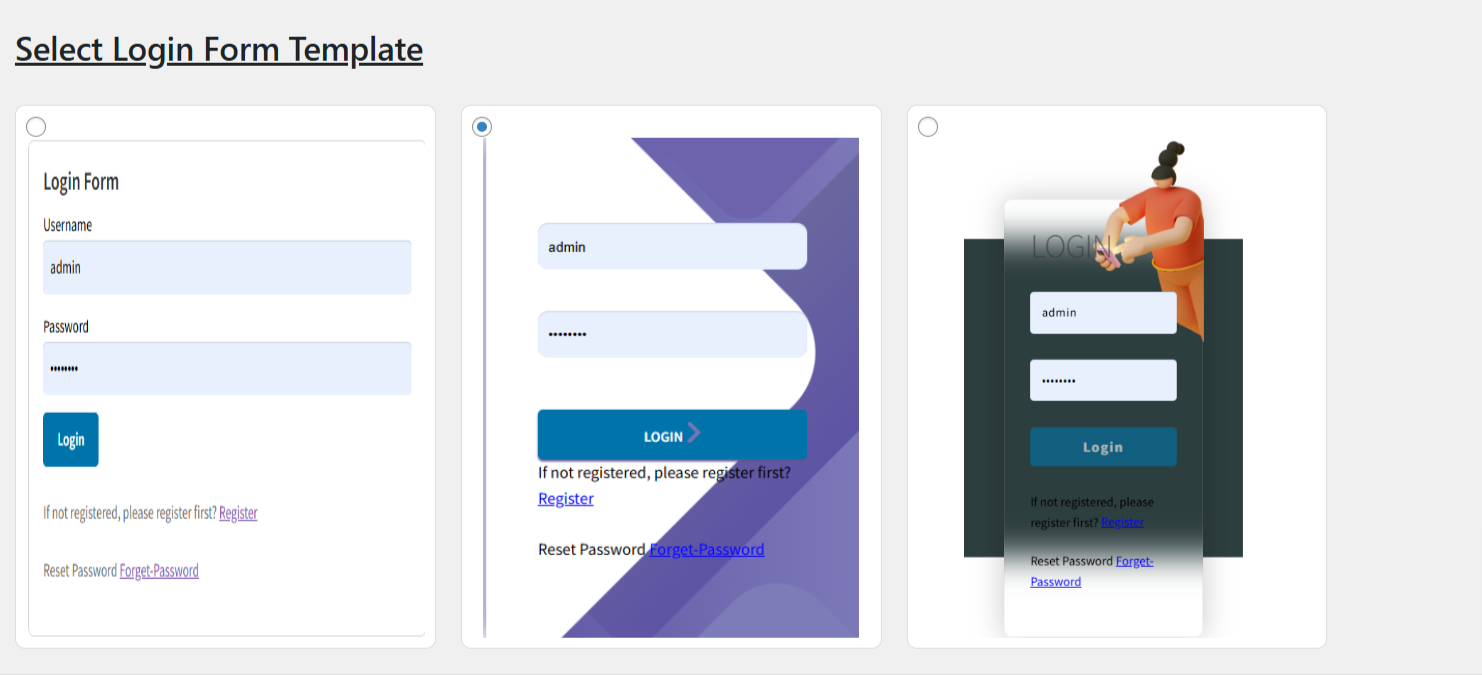
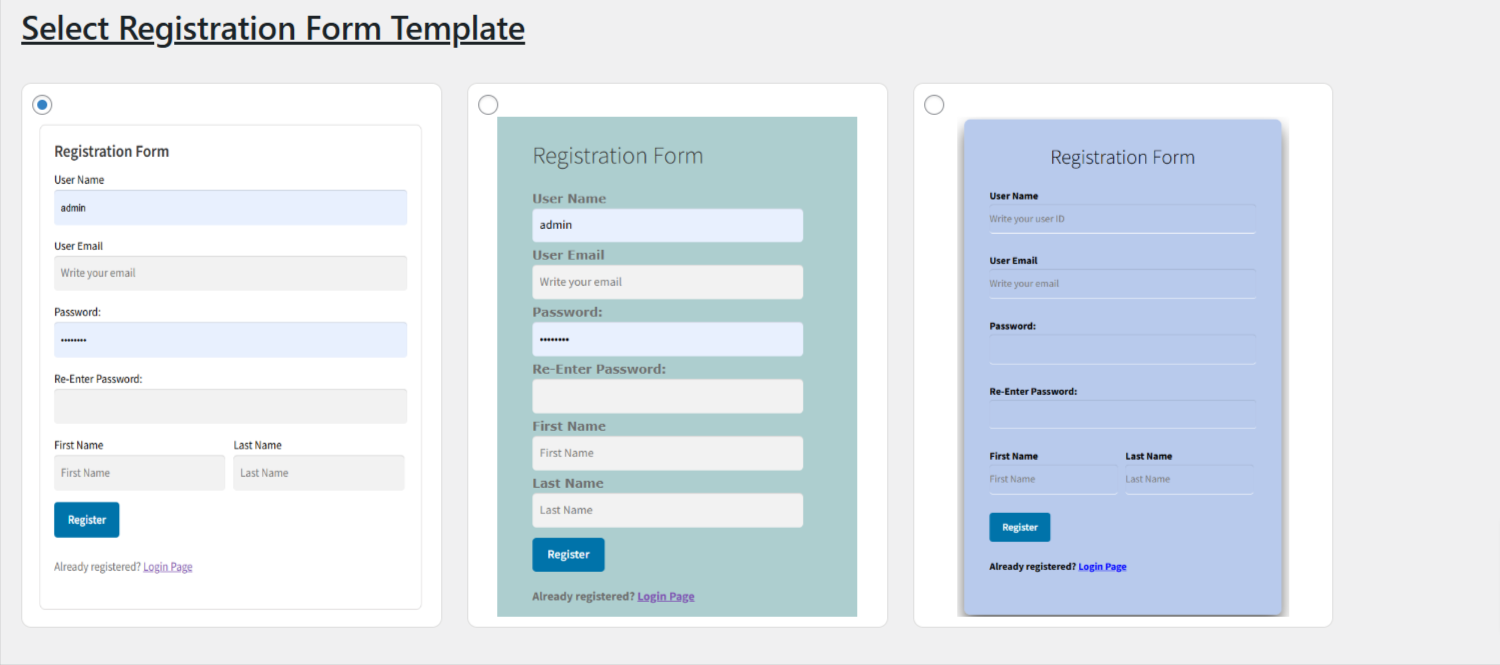
The selected template will shown on the front end like this.
Handle Subscription #
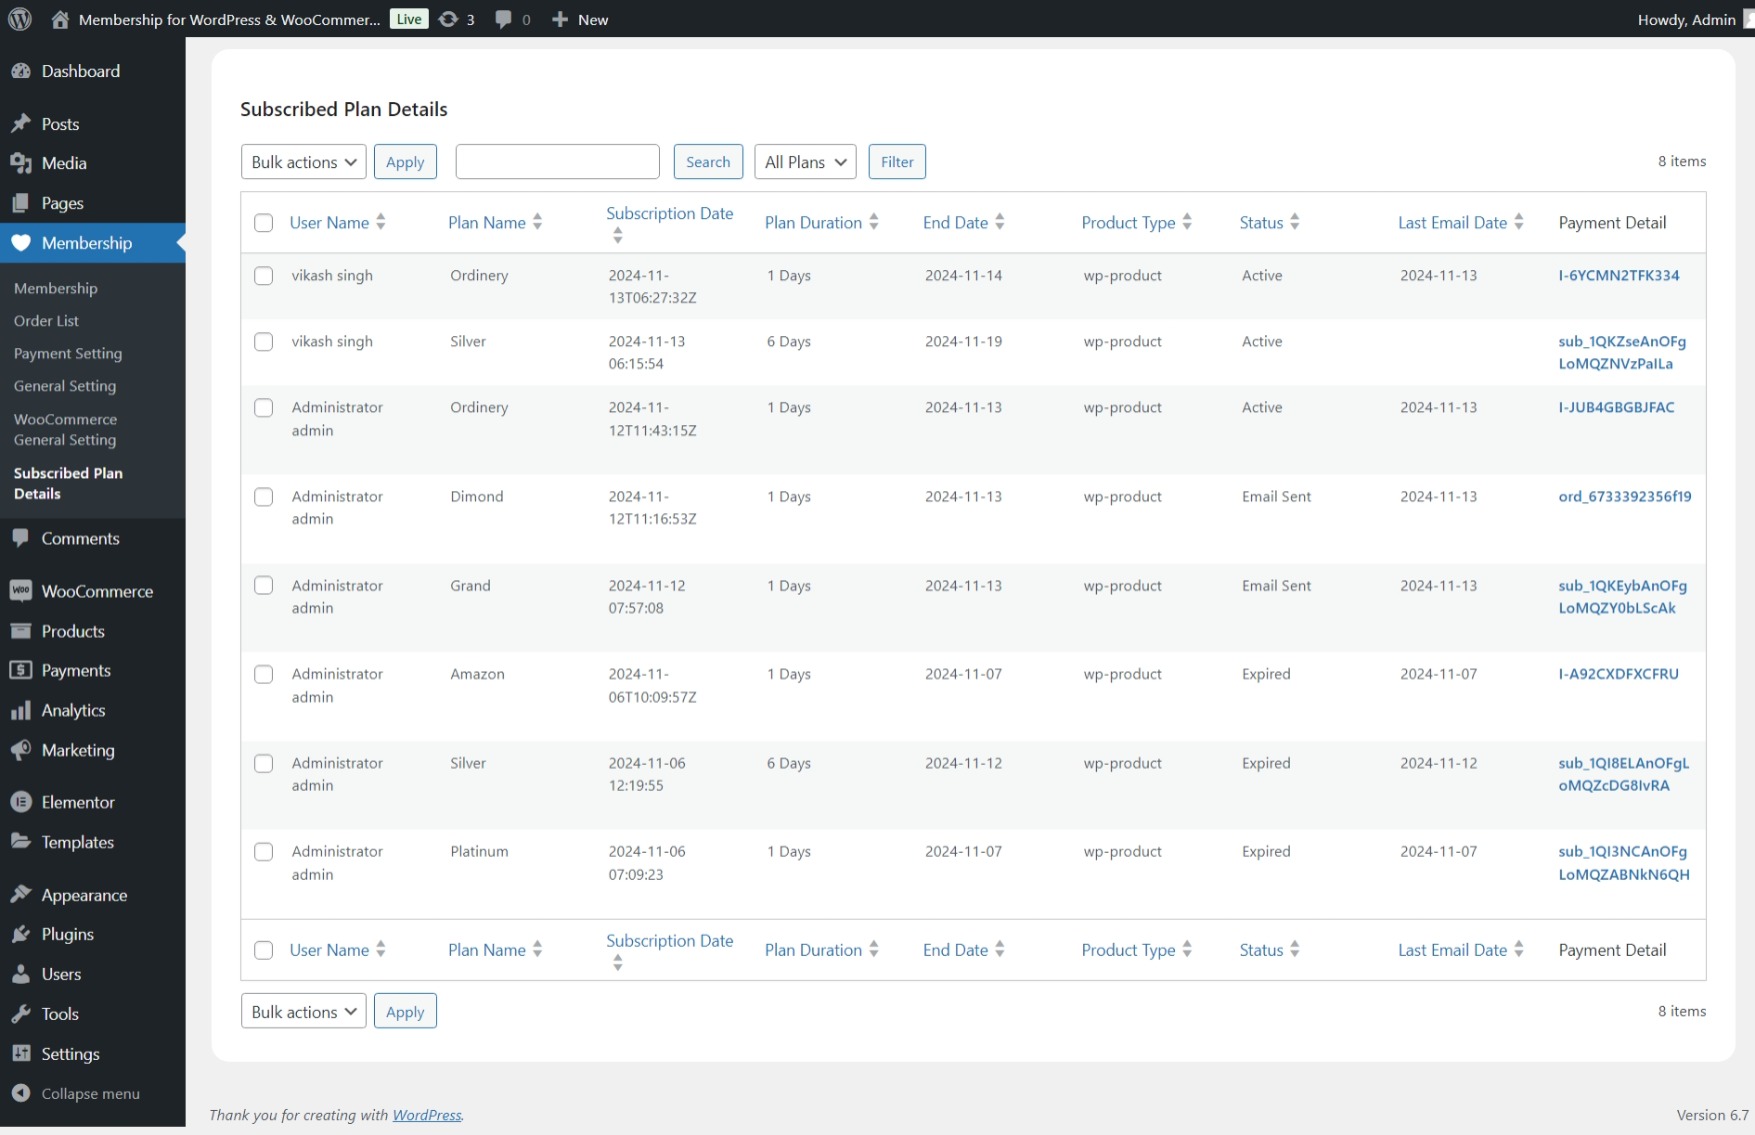
In the Subscribed Plan Details table, you can monitor the subscription status of each subscriber easily. Here’s how it works:
- Tracking Subscription Status:
- The table displays the current status of each subscription, such as ‘Active’ or ‘Expired’.
- A plan filter is available, allowing you to display subscribers for a specific membership plan.
- Active Status:
- If a subscription plan is Active, it will be labeled as ‘Active’ in the status column.
- Email Notifications:
- If the admin has enabled the ‘Enable Sending Email’ option and specified the ‘Number of Days Before Expiry to Send Email,’ users will receive email notifications daily as their subscription approaches its expiration date.
- Once an email is sent to the user, the status will change to ‘Email Sent,’ and the date of the last email sent will be recorded in the ‘Last Email Sent Date’ column.
- Expiry Status:
- After the subscription reaches its expiration date, the status will automatically update to ‘Expired,’ indicating that the user no longer has access to the plan.
- Tracking Subscription Status:
- To know about all payments done for the particular subscription plan click on the subscription ID in the ‘Payment Detail‘ column.
This system helps manage subscriptions effectively, ensuring that both the admin and subscribers are informed about important subscription milestones.
Get The Payment Detail #
To view the payment details for a specific order, follow these steps:
- Access the Orders Page:
- Navigate to the orders section in your admin panel.
- Click on the Username:
- Find the desired order in the table and click on the username of the customer associated with that order.
- Select the Transaction ID:
- On the user’s page, locate and click on the transaction ID related to the order.
- View Payment Details:
- You will be directed to a new page where you can see all the payment details for that specific transaction, including the amount, payment method, and any other relevant information.
This process allows you to efficiently track and manage payment information related to each subscription or order.
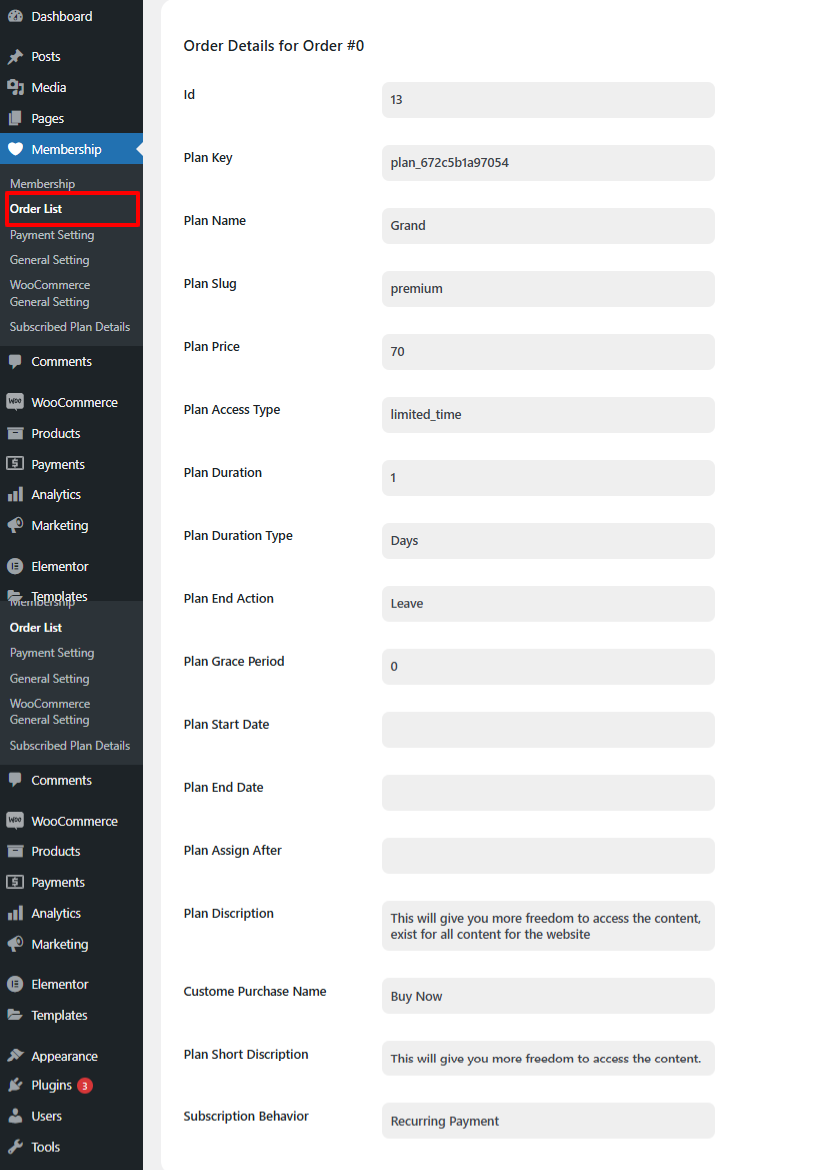
Get The Ordered Plan Detail #
To view the ordered plan details for a specific order, follow these steps:
- Access the Orders Page:
- Go to the Orders section in your admin panel.
- Click on the Username:
- Find the order you’re interested in and click on the username of the customer associated with that order.
- Select the Ordered Plan Name:
- On the user’s page, locate and click on the ordered plan name related to that order.
- View Ordered Plan Details:
- In the new page that opens, you will see all the details related to the ordered plan, including payment information, plan features, and any other relevant details.
This process allows you to efficiently access information about each user’s ordered plan and associated payment details.
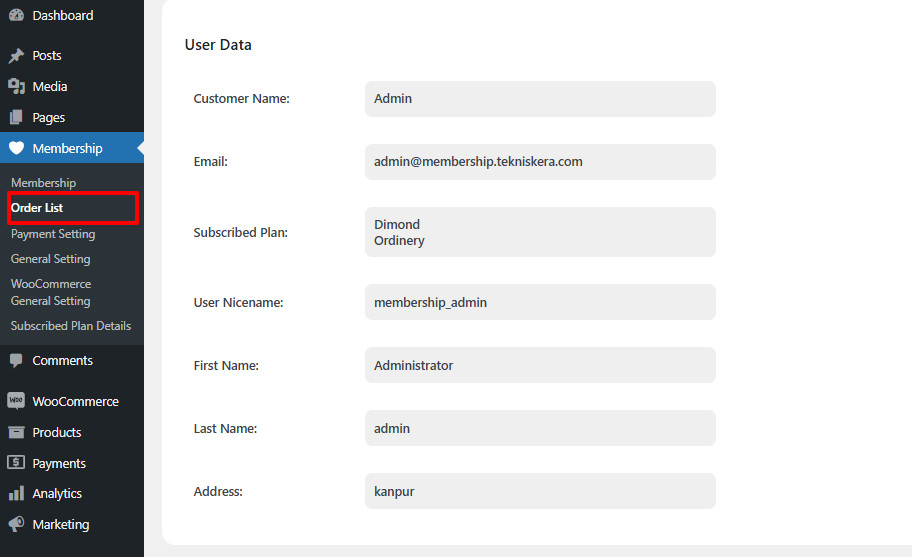
Get The User Detail #
To view the payment details for a specific order, follow these steps:
- Access the Orders Page:
- Navigate to the Orders section in your admin panel.
- Click on the Username:
- Find the desired order in the list and click on the username associated with that order.
- Click on the Customer Name:
- On the user’s page, click on the customer name to access their profile.
- View Customer Details:
- In the new page that opens, you will see all the customer details, including their payment history, contact information, and any other relevant information.
This process allows you to easily access and manage customer information related to each order.
Easy Data Handling #
Every Table has the option to delete, edit, and search for data handling, and filter used to show/hide the column.
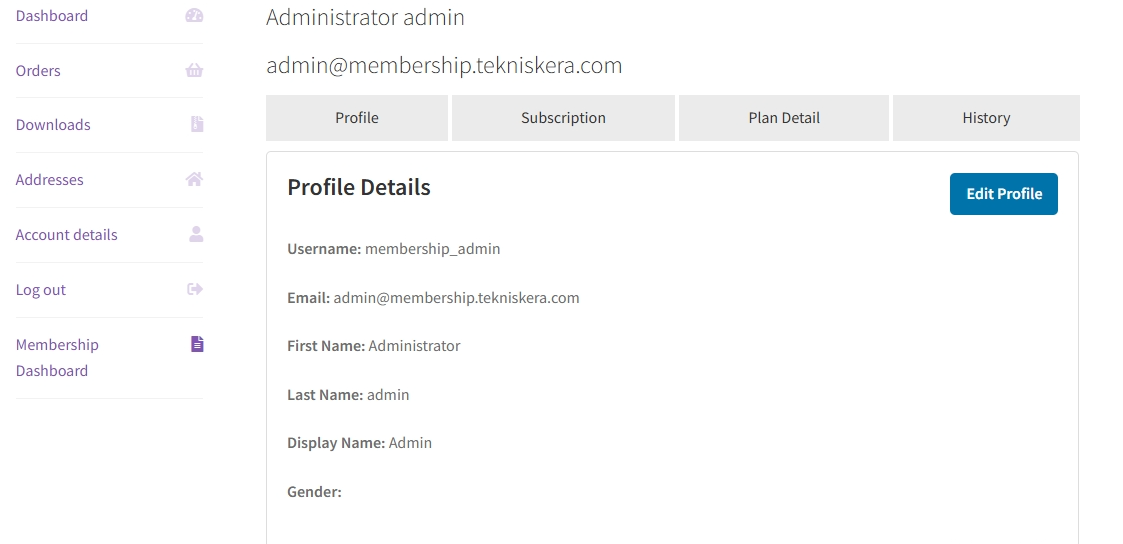
‘My Account’ Custom Page
This page allows you to view all information related to your subscription, payment history, plans, and user details. Follow these steps:
View or Edit Your Details:
- Go to the Profile section on your ‘My Account’ page. Here, you’ll find your personal information listed.
- To make changes, click on the ‘Edit’ button and update the relevant details.
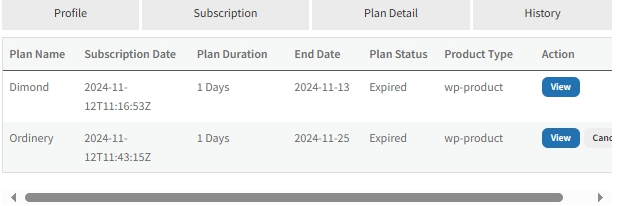
View Subscription Details:
- In this section, all your subscribed plans are listed. To view more information about a subscription, click on the ‘View’ button.
- If the admin has allowed it, you may also see a ‘Cancel’ button below the ‘View’ button for subscriptions with recurring billing. This lets you cancel eligible subscriptions.
Plan Details:
This section displays all the plans created by the admin, allowing you to explore available subscription options.
Payment History:
All payments you’ve made will be listed in this section for easy reference.
This process allows user to easily access and manage their information .
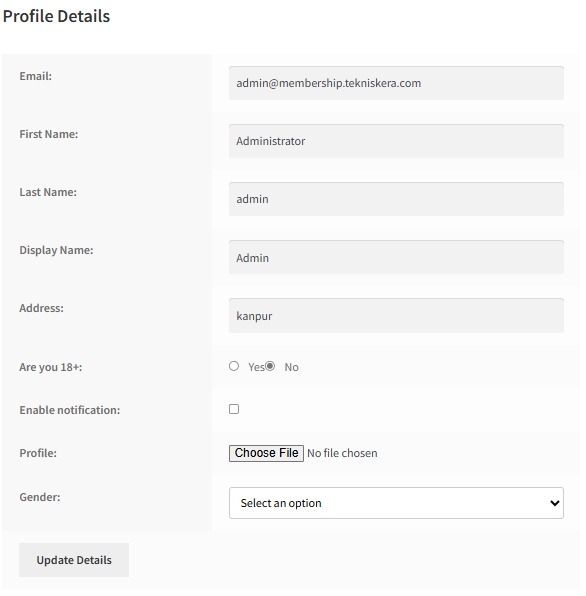
View or Edit Your Details:
- To edit your details, click on ‘Edit Profile,’ fill in the necessary information, and then select ‘Update Details’ to save your changes.
- Go to the ‘Profile’ section, where you’ll see your personal information displayed.
View or Cancel Subscription:
Users can cancel their subscription by clicking on the ‘Cancel’ button.
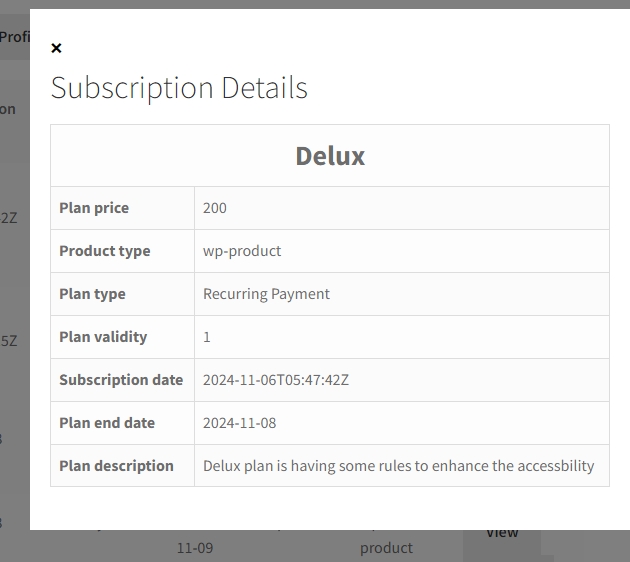
In the Subscription section, users can view their subscription details by clicking on the ‘View’ button.
Note: The ‘Cancel’ button will only appear for subscriptions with a ‘Recurring Payment’ behavior if the admin has enabled the ‘Cancel Subscription’ option for users.
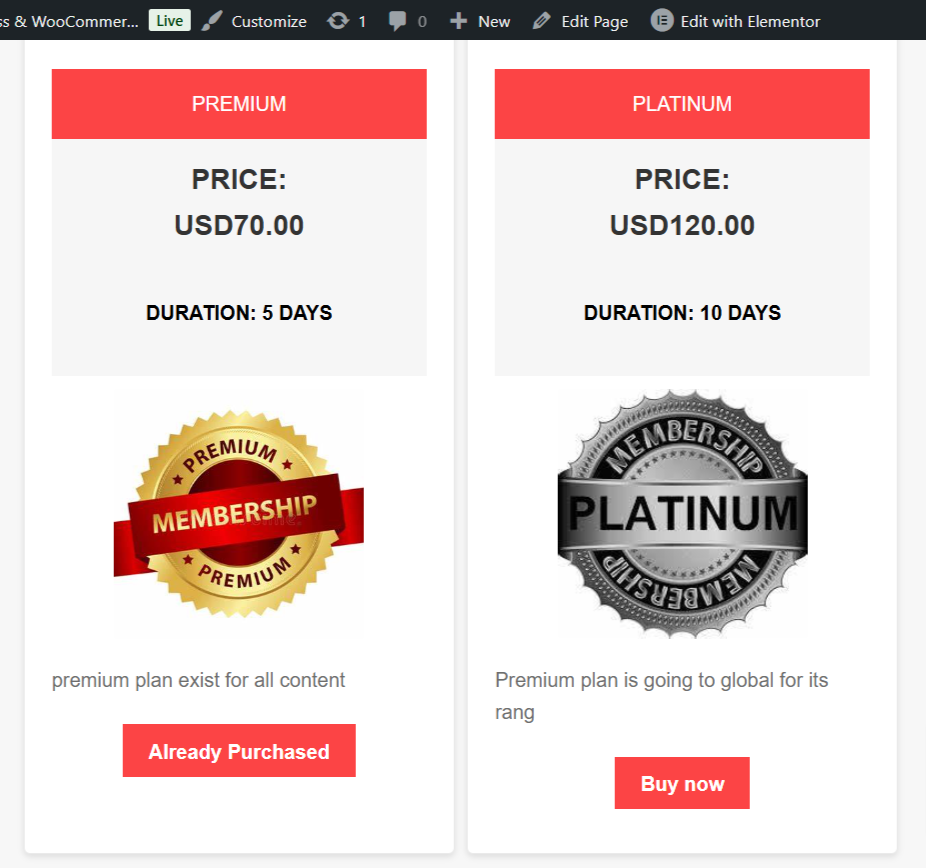
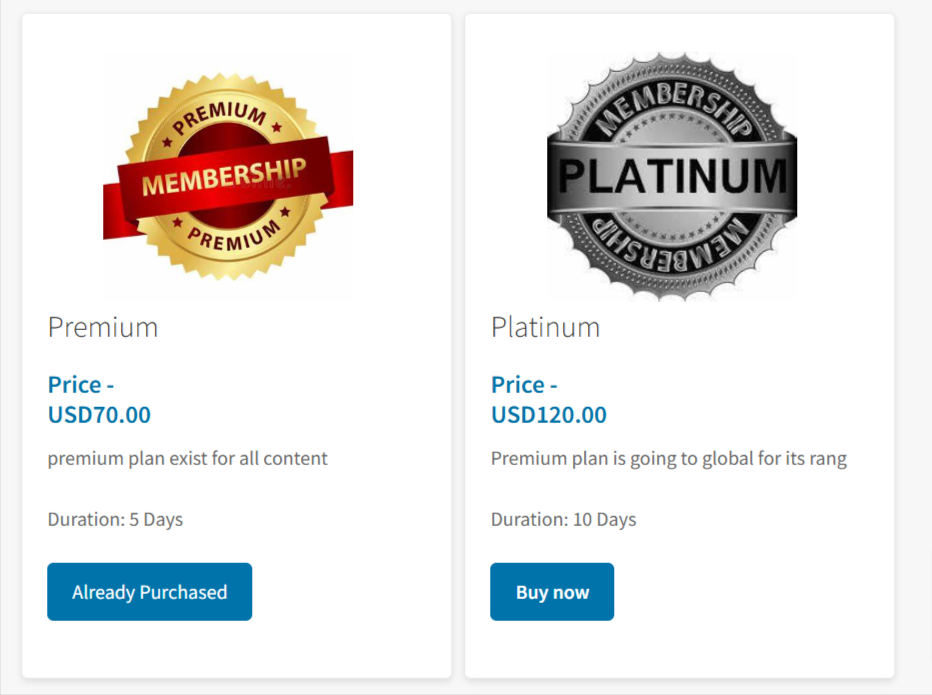
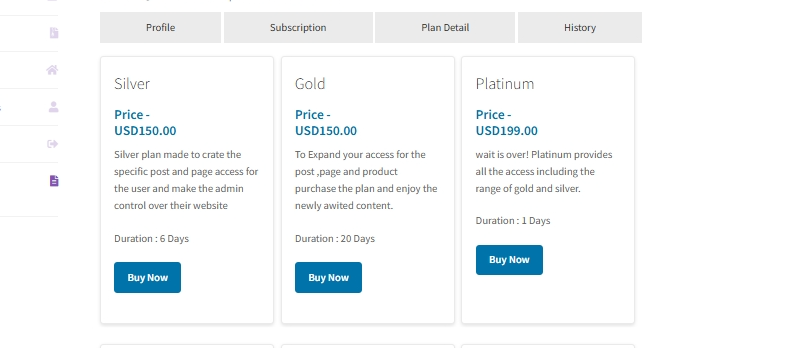
Plan Details:
In the Plan Details section, all plans created by the admin are listed. Plans already purchased by the user will display an ‘Already Purchased’ button. For other plans, a ‘Buy Now’ or custom button will appear.
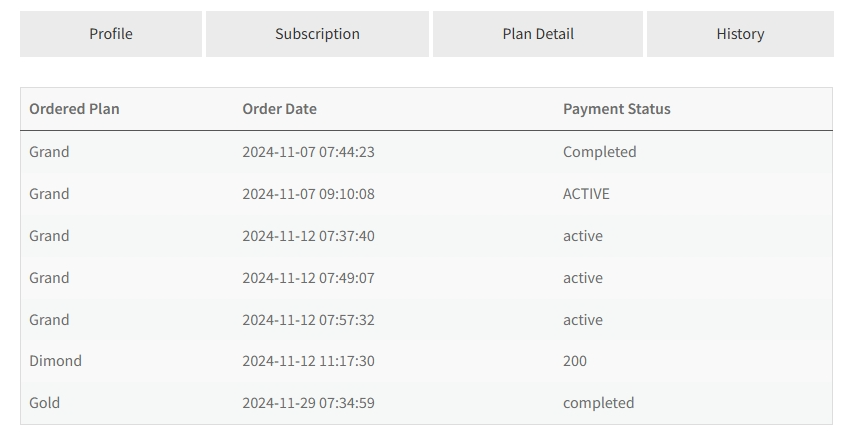
Payment History:
In the Payment History section, all payments made by the user will be listed here.
Benefits: #
- Revenue Growth: By offering tiered memberships and exclusive content, you can create new revenue streams and improve customer retention through recurring payments.
- Customizable and Scalable: Tailor membership plans, content restriction rules, and user access based on your business model, with the flexibility to scale as your membership base grows.
- Seamless WooCommerce Experience: The plugin integrates smoothly with WooCommerce, allowing store owners to leverage existing features like product management, and order handling while layering in advanced membership functionality.
- Easy To Purchase: The Plan can be purchased as WordPress as well as a WooCommerce Product.
Use Cases: #
- Online Learning Platforms: Offer courses or tutorials through a membership system, drip-feeding content over time to maintain engagement.
- Exclusive eCommerce Stores: Provide premium members with exclusive access to products, discounts, or early-bird sales.
- Community Websites: Build private forums or content hubs for members, providing a gated experience for premium content.
FAQ #
What does the Membership For WordPress and WooCommerce plugin do? #
Membership for WordPress and WooCommerce restrict Posts, Pages, and Products based on category, type, and tag and also restrict the specific product, post, and pages .
How to purchase a plan in WordPress? #
For WordPress, there are two types of payment gateways integrated Stripe and PayPal by using these two you can purchase the plan and access regarding content.
May I use a Membership For WordPress And WooCommerce plugins only for WordPress? #
Yes, you can use this plugin for WordPress as well as for WooCommerce together or separately.
How do you sell a plan as a WooCommerce product? #
To sell your membership plans as a WooCommerce product you have to make the plan as a WooCommerce product to make it choosing the product type Membership Plan then in the tab panel there will be a tab of name Membership Plan appear click on this and fill in the fields and other essential data and publish the product your Membership Plan will listed in the shop page as WooCommerce product.
May I can edit the coupon, plan once it is made? #
Yes, you can search for your existing plan and click on edit, modify your plan accordingly, and make “Save Changes”.
How will I know which product is restricted? #
In the WooCommerce product page, there will be a column that will denote Restricted in the restricted product row.
May user can ‘Cancel’ their subscription? #
Yes, the User can cancel their subscription by clicking on the cancel button shown on the subscribed plan row listed on the Membership Dashboard’s subscription section, if the admin allows the user to cancel the subscription.
How could the user know about the Plan, he subscribed to? #
Yes, the User can view the plan by clicking on the ‘View‘ button listed on the ‘Membership Dashboard‘, subscription section.


